Manage SSL Certificates
Create, discover and store SSL certificates in the centralized repository of PAM360. Raise requests for new certificates and domain additions to the existing certificates. You receive notifications when the certificates are about to expire, to help you with their timely renewal.
Use PAM360 to:
- Create, discover, or import self-signed or CA issued certificates in the network.
- Generate Certificate Signing Request (CSR).
- Add requests for new certificates or adding a sub domain to an existing certificate.
- Receive notifications when certificates are about to expire.
Steps to Manage SSL Certificates
- Discover SSL certificates in your network
1.1 Discover SSL certificates on demand
1.2 Discover SSL certificates from SMTP servers
1.3 Discover SSL certificates deployed to load balancers
1.4 Discover SSL Certificates from a Shared Directory Path
1.5 Discover SSL certificates using the Key Manager Plus (KMP) agent
1.6 Discover SSL certificates automatically through schedules
1.7 Discover certificates mapped to user accounts in Active Directory
1.8 Discover SSL Certificates Hosted on AWS (ACM & IAM)
1.9 Discover SSL Certificates using ManageEngine Mobile Device Manager Plus
- Create self-signed certificates
- Generate CSRs
- Certificate signing
4.1 Microsoft Certificate Authority
4.2 Microsoft CA with Agent
4.3 Sign with Root
- Import and Export Certificates
- Certificate Renewal
- Certificate History
- Certificates Sync Status
- Edit and Delete Certificates
- Certificate requests
10.1 Add Certificate Request
10.2 Certificate request status
10.3 Terminate the certificate request life-cycle
- Control expiry notification schedule
- Track domain expiration through WHOIS lookup
- SSL certificate group
13.1 Create certificate groups
13.2 Edit certificate groups
13.3 Delete certificate groups
1. Discover Certificates in your Network
You can automatically discover all the certificates available in your network using PAM360, irrespective of the CA. You can discover the certificates anytime as needed or periodically based on scheduled tasks. The discovery options are quite flexible - you can discover certificates from a single server or multiple servers, and from multiple ports, at one go. PAM360 also allows users to rediscover the expired and about-to-expire certificates from the 'Certificate Expiry' widget in the Dashboard.
1.1 Discover SSL Certificates On Demand
To discover the certificates manually:
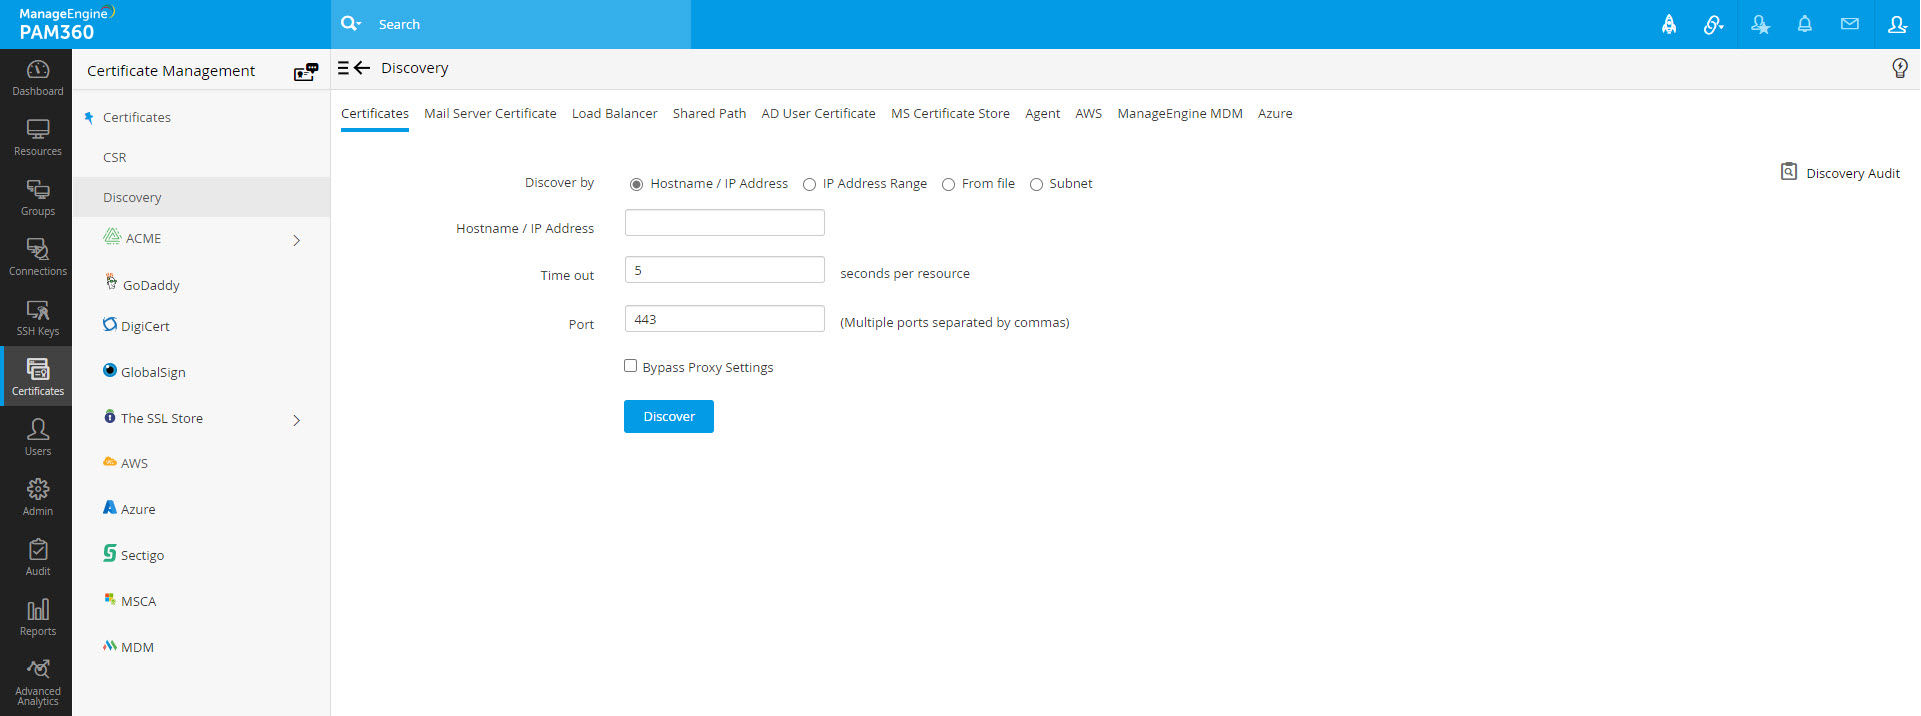
- Go to Certificates >> Discovery.
- Click the Certificates tab.
- Select an option for the type of discovery.
- Hostname/IP address – Enter the name or IP address of the server from which the SSL certificates are to be discovered.
- IP address range – Specify an IP range and discover all the SSL certificates available in the servers falling under the range.
- From file – If you have a list of the servers in which certificates are available in your network saved as a text file, it can be loaded directly and all these certificates can be discovered.
- Subnet – Use this option to discover resources from specific subnetworks within an IP range.
- In SSL Hostname discovery if you want the host name to resolve to a specific IP address, provide the IP address after host name separated by colon (:) as shown below
complex:172.168.203.56
Same format can be provided in "From file" discovery also.
Notes:
- You can specify multiple ports separated by commas for the discovery of SSL certificates in a single discovery instance.
- During SSL discovery or when manually adding certificates to the PAM360 repository, you can exclude specific certificates by providing their details (common name and serial number) under Admin >> SSH/SSL Config >> Excluded Certificates. The specified certificate will be excluded from being imported into the PAM360 certificate repository during discovery or manual addition.
0.0.0.0
6565
test-username-10
443
192.168.20.20 8282
- For bulk discovery using IP address range and Subnet options, there is an Exclude IP Address field that allows you to exclude specific resources from being discovered. Specify the IP addresses of the resources that need to be excluded one below another.
- Specify values for the Time out and the Port options.
- Time Out: Refers to the number of seconds the application tries to discover the certificates (each). The default value is 5 seconds.
- Port: It refers to the port on the end terminal used for SSH communication. Port 443 is used by default for SSL certificates.
Note: You can specify multiple ports separated by commas for the discovery of SSL certificates in a single discovery instance.
- Select the Bypass Proxy Settings checkbox to bypass proxy server settings if you have enabled them under Admin Settings. If this option is selected, PAM360 will bypass the proxy server and directly perform online certificate discovery. The option to bypass the proxy server is available for SSL certificate discovery using Hostname/IP Address, IP Address Range, From File, and Subnet modes. In addition, you can bypass proxy server during scheduled certificate discovery as well.
- Click Discover. You will be redirected to the Discovery Status page where the status of the current discovery instance is updated.
1.2 Discover SSL Certificates from SMTP Servers
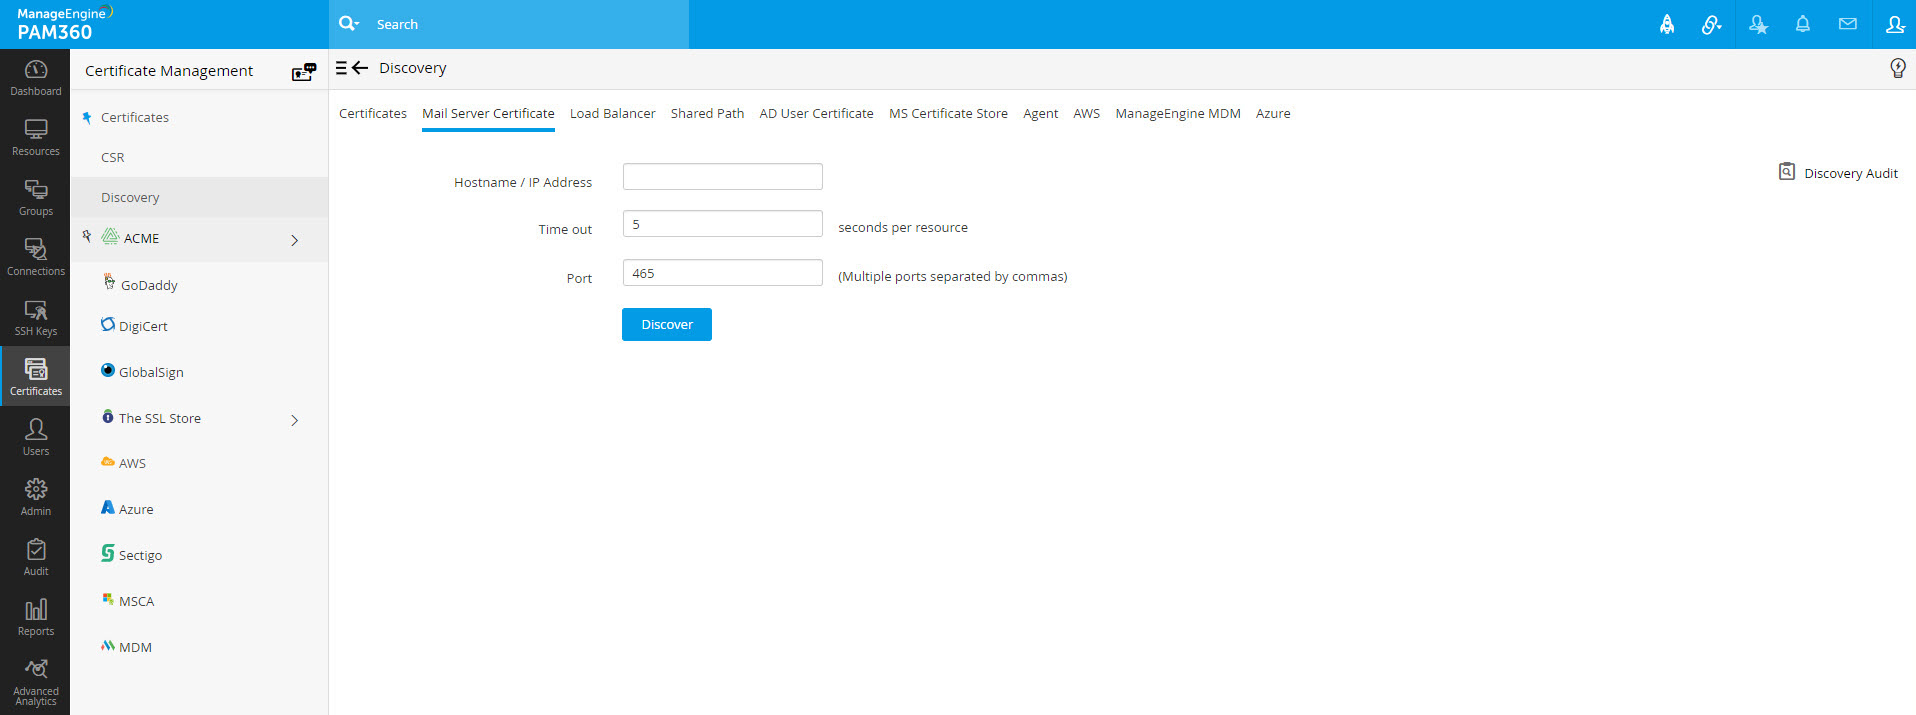
You can discover SSL certificates used by mail servers present in your network and consolidate them in PAM360's centralized certificate repository. To perform mail server certificate discovery:
- Navigate to Certificates >> Discovery >> Mail Server Certificate.
- Provide the Hostname / IP address from which the certificate is to be discovered and specify the port number. You can specify multiple port values by separating them with commas.
- Click Discover. On successful discovery, the certificates are fetched from the specified resources and added to PAM360's repository.
1.3 Discover SSL Certificates Deployed to Load Balancers
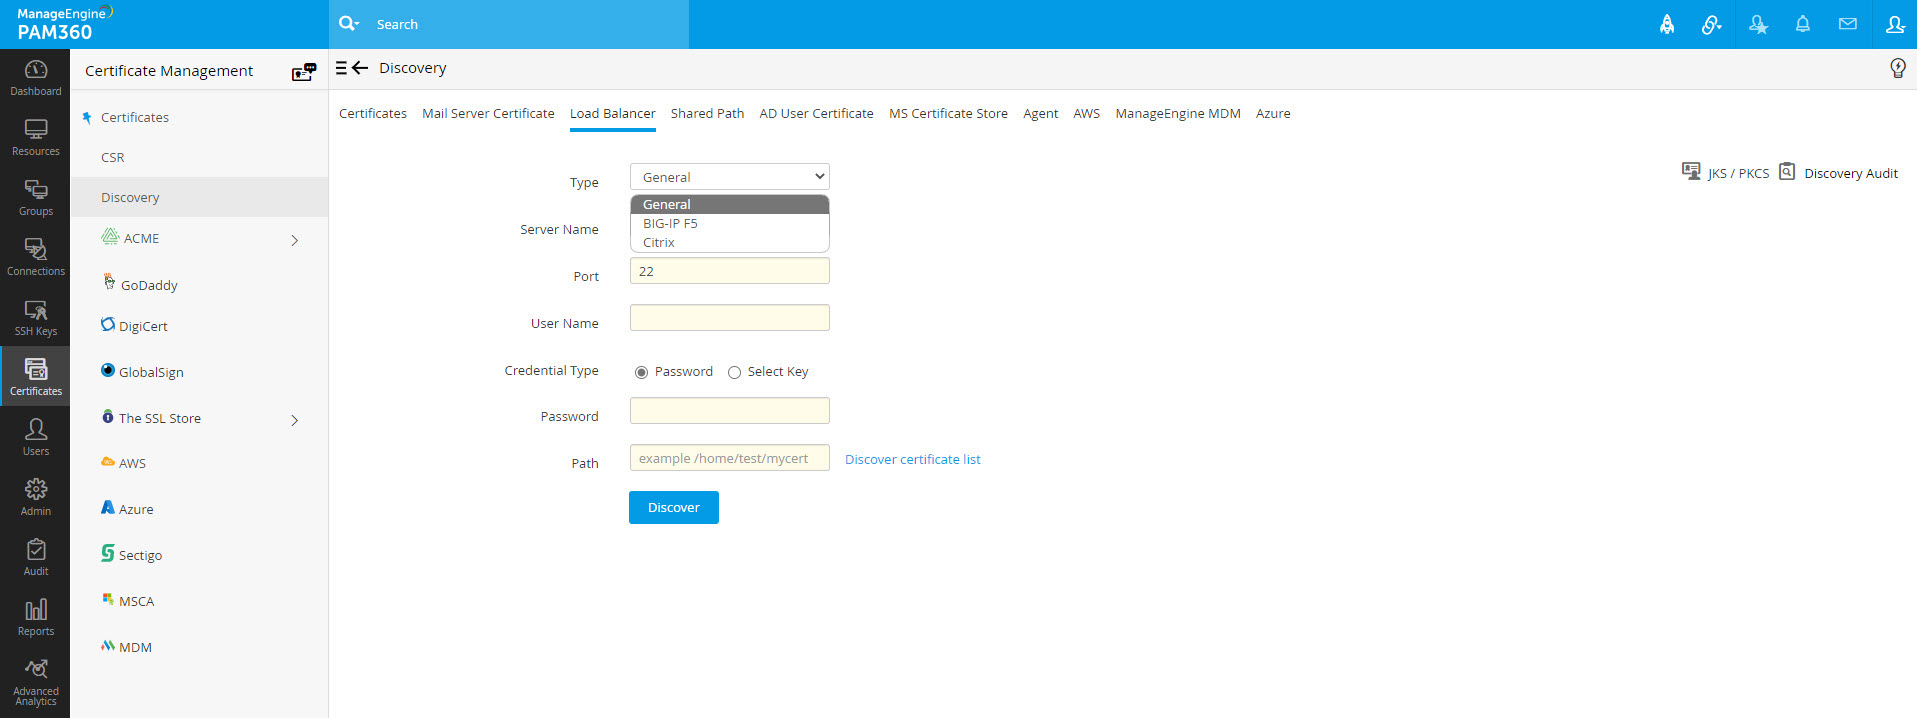
PAM360 allows you to discover SSL certificates deployed to load balancers, within your network, and consolidate them in its secure, centralized repository. As of now, PAM360 supports discovery of certificates from Linux-based load balancers only (i.e., Nginx, F5, etc) and the process is tunnelled via SSH. To perform load balancer certificate discovery:
- Navigate to Certificates >> Discovery >> Load Balancer.
- Specify the Server Name, Port, User Name, Credential Type, Password and Path.
- You can opt for a key-based authentication for password-less resources by choosing the Select Key option. Upload the private key associated with the required user account and specify the key passphrase.
- Select a load balancer type from the drop-down. PAM360 supports three types of Load Balancer discovery: General, BIG-IP F5, and Citrix. You can perform Citrix type discovery in two ways: using CLI commands and using REST API.
- Once you have provided the user credentials, specify the path to the folder in the server from where the certificates have to be discovered.
- The Discover certificate list option fetches all the certificates available in the specified path and helps you choose certificates that you wish to discover and import.
- To discover Citrix load balancers, do the following:
- Choose the type as General, enter the Citrix load balancer path, and click Discover.
- In case that does not work, choose the type as Citrix, enter the path, and try again.
- If both the above methods fail, choose the type as Citrix, select the checkbox Use REST API (By default PAM360 uses CLI commands for discovery and fetching certificates), enter the path, and click Discover.
- Select a Citrix Credential from the dropdown.
- Click Manage Credentials to add or delete a credential.
- In the pop-up that appears, click to Add and mention the Credential Name, Server IP, Citrix Username and Citrix Password.
- Click Test Login to test the credential and click Save Credentials.
- To Delete a credential, select a credential you want to delete and click Delete and in the pop-up that appears click Ok.
- Enter the path, and click Discover.
- During Citrix load balancer discovery using REST API, you can choose to bypass your proxy server settings by selecting the Bypass Proxy Settings checkbox. This option is allows you to bypass the proxy server you have enabled under Admin settings directly perform Citrix load balancer discovery through the internet.
- Please note that you can choose to bypass proxy server settings for Citrix load balancer discovery only if you select the Use REST API (By default PAM360 uses CLI commands for discovery and fetching certificates) option. The bypass proxy server option is also available during scheduled Citrix load balancer discovery.
- The certificates are successfully discovered and imported into PAM360's centralized certificate repository. You can view them from the Certificates tab. The Discover certificate list option fetches all the certificates available in the specified path and helps you choose certificates that you wish to discover and import.
- Certificate files with the extensions .keystore and .pfx are not automatically imported into the certificate repository; they require their passphrases to be provided in order to be imported into PAM360. To import these files, click JKS / PKCS at the top-right corner of the window. In the window that pops up, choose the certificate file(s) that you wish to import and click Import from the top menu. In the pop up that opens, provide the file passphrase(s) and again click Import.
- The chosen certificate files are successfully imported and added to PAM360's certificate repository.
Note: During the Citrix REST API-based load balancer discovery, the user credentials you provide must have sufficient permissions to read files and for REST API access. Therefore, to ensure success of the discovery, it is recommended that you supply the credentials of an account which has the superadmin role.
1.4 Discovering SSL Certificates from a Shared Directory Path
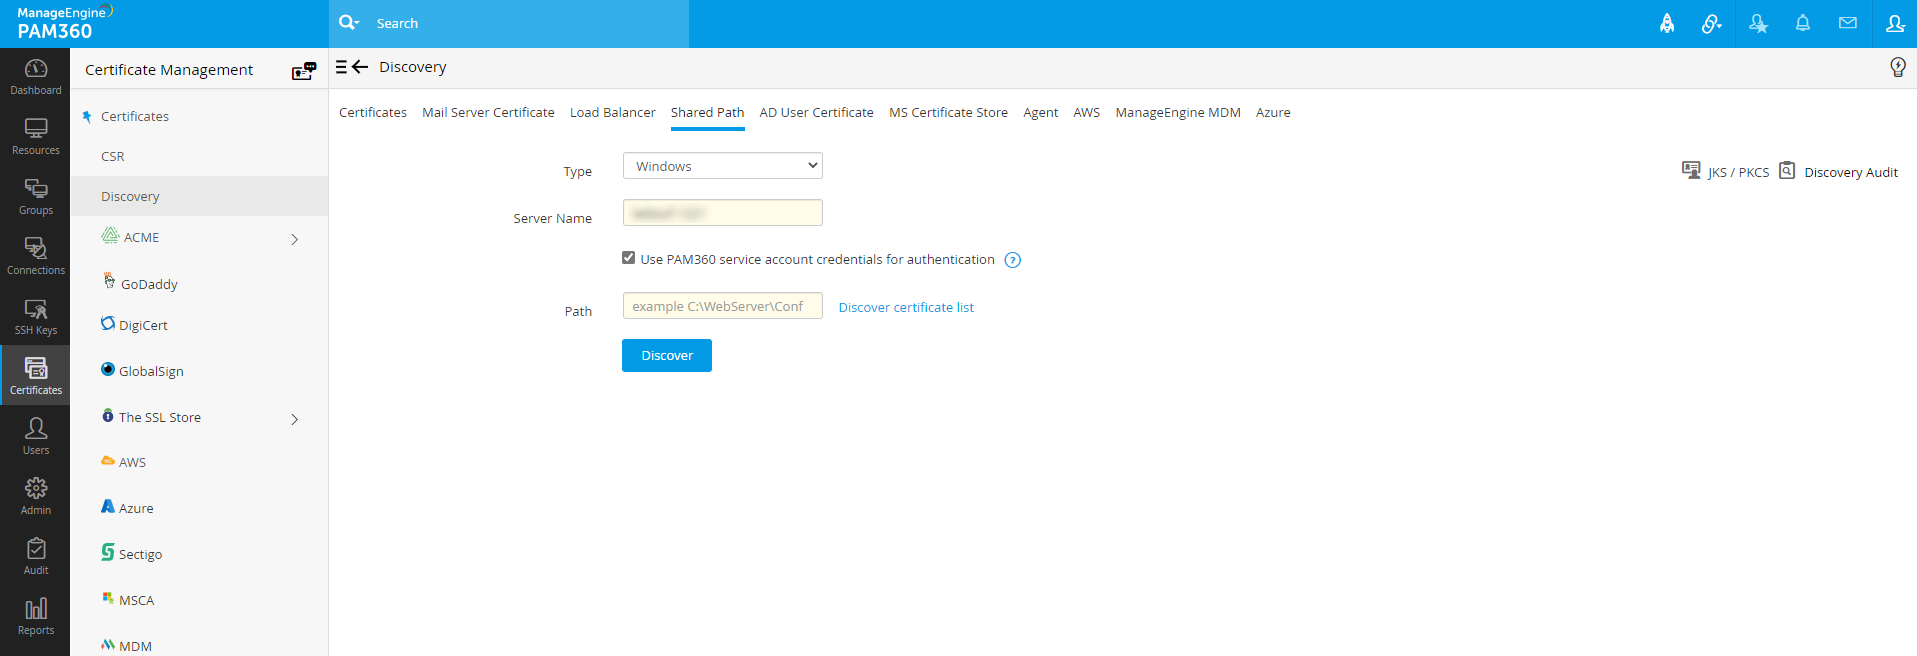
PAM360 allows you to discover SSL certificates that are saved in a shared directory path within your network and consolidate them in its secure, centralized repository. Using this option, you can discover all the certificate files saved in a particular folder and then, either add all the certificates to the repository or choose the ones you want to import. During the discovery process, PAM360 will scan only the folder specified in the path and nowhere else in the target machine.
Follow the below steps to discover and import SSL certificates from a shared directory path:
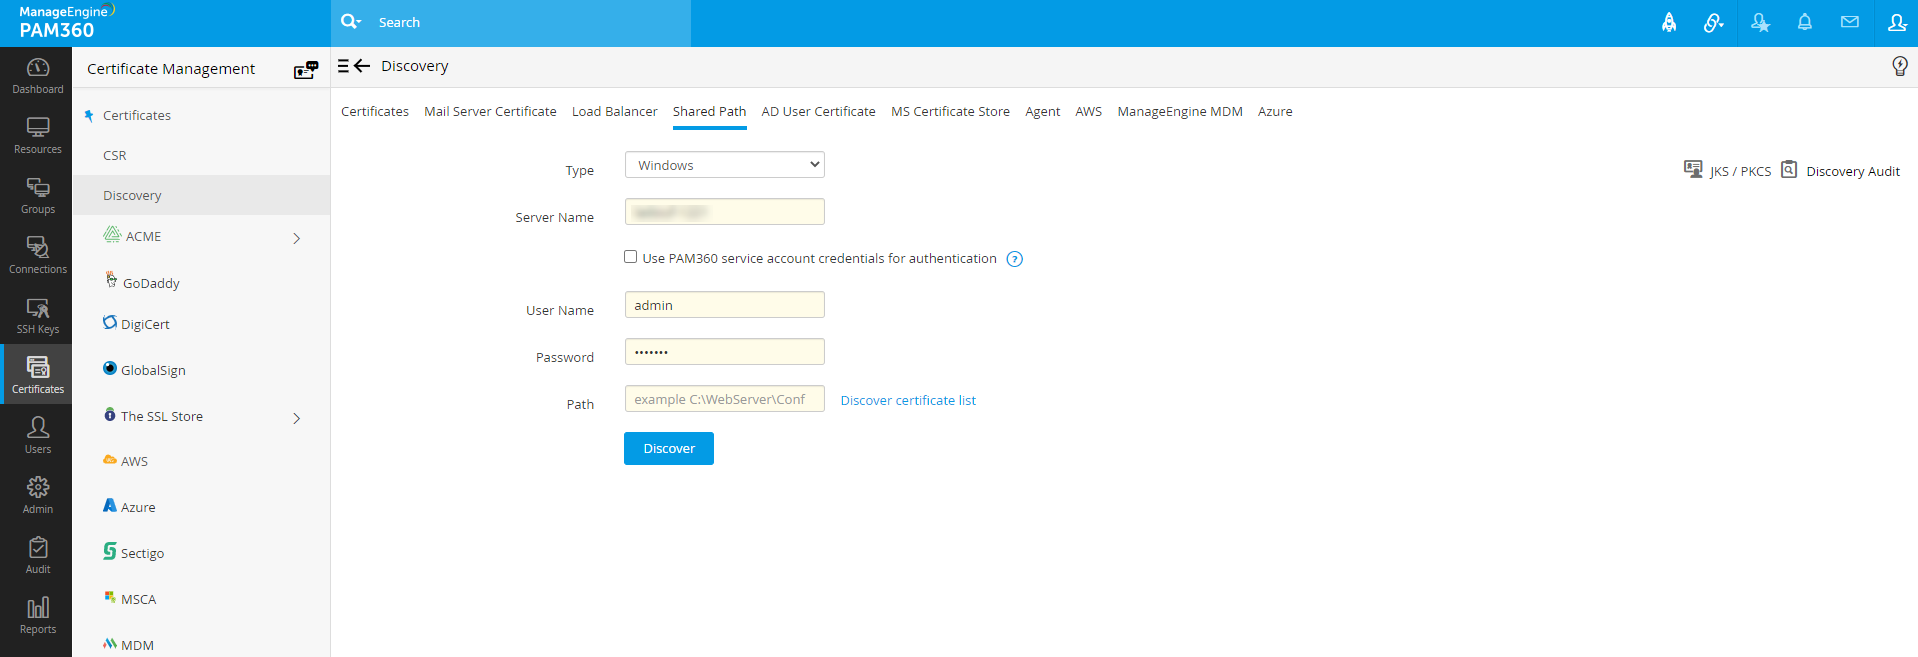
- Navigate to Certificates >> Discovery >> Shared Path. Choose Windows or Linux/Mac OS from the Type drop-down.
- For Windows:
- Enter the Server Name of the target machine where the shared path resides; leave this field empty if you are entering a directory path from your local machine.
- Select the checkbox to Use PAM360 service account credentials for authentication or provide a username and password.
- Specify the directory path of the target machine. Example: D:\sharedpath\subsharedpath.
- For Linux/Mac OS:
- Enter the Server Name of the target machine where the shared path resides, the port, and the username.
- For authentication, either choose the Password option and enter the password directly or choose the Select Key option and upload a private key with its passphrase for SSH key-based authentication.
- Specify the directory path of the target machine. Example: \home\test\shared.
- Click the Discover certificate list option to fetch all the certificates available in the specified path. From this list, choose certificates that you require and click Discover. If you don't choose any specific files, all certificate files found in the shared path will be imported.
- Certificate files with extensions .keystore and .pfx are grouped separately under the JKS / PKCS option in the top right corner. To import these certificates, click JKS / PKCS, choose the certificate files that you wish to import, provide the file passphrase, and click Import.
To check the status of the discovery, click the Discovery Audit tab.
Note: Certificate files that are over 30 KB in size will not be imported during this discovery operation.
1.5 Discover SSL certificates using the Key Manager Plus (KMP) Agent
You can discover SSL certificates deployed across your network using the KMP agent right from the PAM360 web interface. This functionality enables you to download and deploy KMP Windows agent to target systems. It also allows you to discover and import the certificates from those systems into a centralized certificate repository directly from the PAM360 web interface. The server(s) in which the agent is deployed is connected to the PAM360 server via a secure HTTPS connection.
Discovering certificates through the KMP agent is helpful in the following scenarios:
- When the administrative credentials of the target server(s) required to perform the discovery operation are not available in the PAM360 server.
- When you have to discover the certificates from servers that PAM360 doesn't have direct access to—say, for instance, the servers in demilitarized zones (DMZs). In such cases, the agent is usually installed in an intermediate jump server which has the permission to access the remote servers and pass on the required information to the PAM360 server.
To discover the SSL certificates using the KMP agent, you need to download and install the agent first. Follow the steps below:
To perform SSL certificate discovery through KMP agent:
- Navigate to Certificates >> Discovery >> Agent.
- Choose the type of discovery you want to perform—Domain-based, Certificate Store or certificates issued by Microsoft Certificate Authority.
- Select the required agent from the drop down to perform the operation.
- If the agent is busy, wait and try again after sometime.
- For Microsoft CA discovery, you can choose to exclude expired / revoked certificates or perform discovery based on issue date or certificate template using the filters provided.
- Click Discover.
The certificates are discovered from the servers in which the agent is installed and imported into PAM360's certificate repository.
1.5.1 Discover SSL Certificates from a Directory Path in a Remote Machine
PAM360 allows you to discover SSL certificates that are saved in a directory path in a remote machine that is not directly accessible by the PAM360 server—this is achieved through the Key Manager Plus agent. Once the certificates are discovered, you can consolidate them into PAM360's centralized repository. Using this option, you can discover all the certificate files saved in a particular folder and either add all the certificates to the repository or select only the ones you require. During the discovery process, the Key Manager Plus agent will scan only the folder specified in the path and nowhere else in the target machine.
Follow the below steps to discover and import SSL certificates from a directory path in remote machine:
- Navigate to Certificates >> Discovery >> Agent and choose Directory as the type of discovery.
- Select an agent from the drop-down menu.
- Specify the directory path of the target machine, e.g. D:\shared path\subsharedpath.
- Click the Discover certificate list option to fetch all the certificates available in the specified path.
- From this list, choose certificates that you require and click Discover.
- Enter a time out interval in seconds.
- Certificate files with extensions .keystore and .pfx are grouped separately under the JKS / PKCS option in the top right corner. To import these certificates, click JKS / PKCS, choose the certificate files that you wish to import, provide the file passphrase, and click Import.
To check the status of discovery, click the Discovery Audit tab.
Notes:
- This feature will work with the latest Key Manager Plus agent only.
- Certificate files that are over 30 KB in size will not be imported during this discovery operation.
1.6 Discover SSL Certificates Automatically Through Schedules
SSL Certificate discovery can also be scheduled to occur at periodic intervals.
- Navigate to Admin >> SSH/SSL Config >> Schedule.
- Click the Add Schedule button.
- In the Add Schedule window, enter a name for the schedule and select the type of schedule as SSL Discovery.
- Specify the start and end IP addresses and the port on the end terminal to check for SSL certificates.
- Select the recurrence type – hourly, daily, weekly, monthly, or once only. Set the starting time, date, or day corresponding to the option chosen.
- Enter the email addresses of the users to be notified. The email settings can be configured from the Settings >> Mail Server Settings tab.
- Click the Save button.
You will get a message confirming addition of a new schedule.
1.7 Discover SSL Certificates Mapped to User Accounts in Active Directory
PAM360 helps you discover and manage the certificates mapped to user accounts in Active Directory.
To perform AD user certificate discovery,
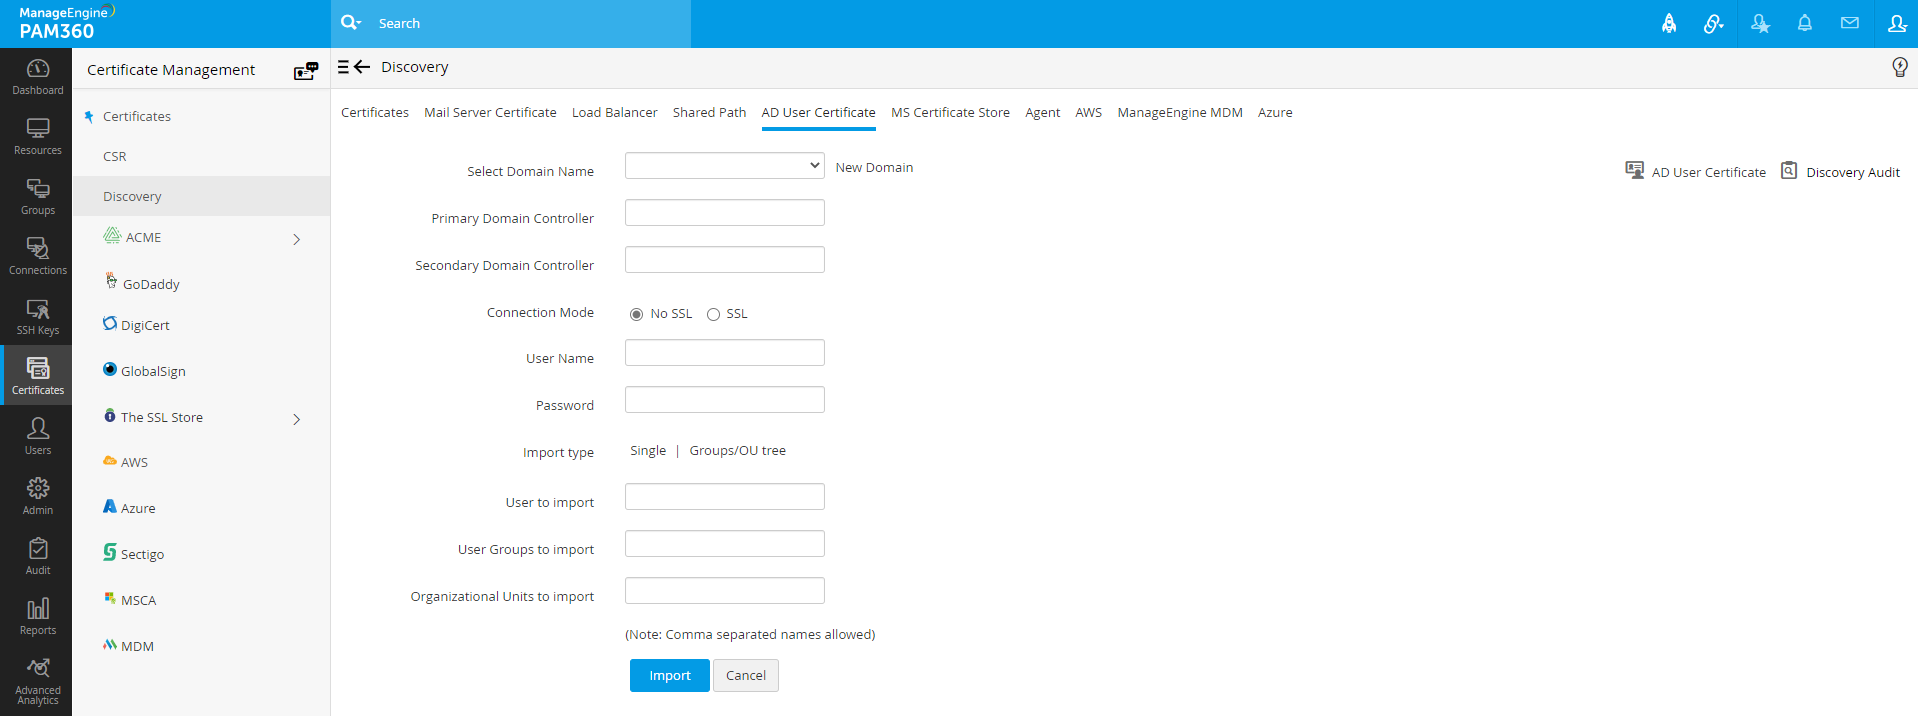
- Navigate to Certificates >> Discovery >> AD User Certificate
- Select the required Domain Name, which forms part of the AD from the drop-down.
- Specify the DNS name of the domain controller. This domain controller will be the primary domain controller.
- In case, the primary domain controller is down, secondary domain controllers can be used. If you have secondary domain controllers, specify their DNS names in comma separated form. One of the available secondary domain controllers will be used. When you use SSL mode, make sure the DNS name specified here matches the CN (common name) specified in the SSL certificate for the domain controller.
- Enter a valid user credential (user name and password) of an user account within the particular domain. Then enter the users / user groups / OUs in which you want to perform the certificate discovery and click Import. To perform certificate discovery for groups/OUs as a whole, choose Groups/OU tree Import type and select the required groups from the drop down list.
- PAM360' also provides an option to import AD users while performing the certificate discovery. Enable the check box Import AD users to import those AD user accounts into PAM360 for which the certificate discovery is done.
- The discovered certificates automatically get added to the certificate repository of PAM360.
1.7.1 Manage SSL Certificates from MS Certificate Store and Local CA
PAM360 helps you request, acquire, discover, consolidate, track and manage certificates from MS Certificate Store and those issued by Local certificate authority. Before importing / acquiring certificates from MS Certificate Store and Local CA, ensure that you use your domain administrator account as PAM360' service logon account.
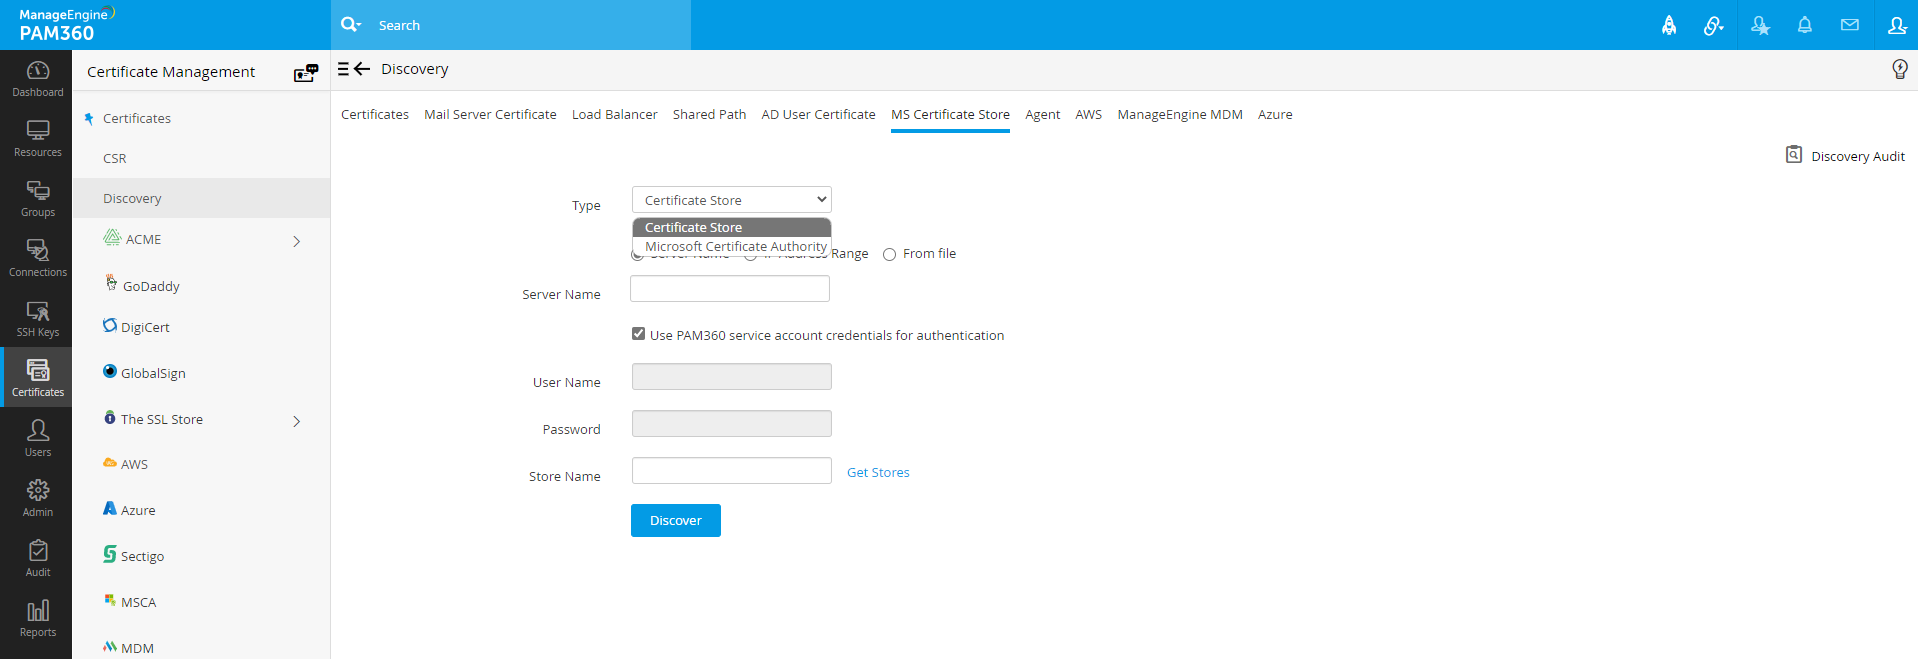
- Navigate to Certificates >> Discovery >> MS Certificate Store
- To discover and import certificates issued by Microsoft CA alone, select Local Certificate Authority option from the drop down. In the process, you can choose to exclude expired / revoked certificates by deselecting the check-boxes below.
- To discover all the certificates from MS certificates store, choose Certificate Store type from the dropdown menu.
- Select the checkbox to Use PAM360 service account credentials for authentication or you can specify the other details such as the Name of the Windows domain controller machine and domain admin credentials.
- If you choose to Use PAM360 service account credentials for authentication, you can select IP Address Range to mention the Start IP and End IP to discover the certificates.
- Specify the certificate store name from which the certificates are to be discovered and imported.
i.e., Following format to be used while specifying the certificate store name:\\server_name\store_name
i. e.g., server_name\Root (To discover certificates from trusted root certification authorities)
ii. e.g., server_name\My (To discover personal certificates) - Or you can also click Get stores to fetch the list of stores available in the Windows Domain Controller and choose the required certificate store that you want to discover.
- Click Discover. You can view the discovered certificates in Certificates tab.
- To discover certificates issued by a particular MSCA, select Type as Microsoft Certificate Authority from the drop-down, enter the Server Name, required credentials, and enter an MSCA name in the Microsoft Certificate Authority text box. Please note that this text box will be visible only if your PAM360 server is installed in a Windows Server machine.
- During discovery, you can choose to include expired, revoked certificates by selecting the respective check boxes. Select Date Filter and enter a date range to filter the discovered certificates as per the given range. Select the Template Name / OID option to choose certificate templates. You can add up to five certificate templates for each discovery operation. This option is available during scheduled discovery of certificates issued by a particular MSCA as well.
Note: During Windows Certificate Store discovery, if the target server name is not specified, choosing Get Stores option will list down all the certificate stores available in the local host.
To request and acquire certificates stored in Local CA from PAM360, you have to initially generate a certificate signing request, then get it signed from the local certificate authority using the steps mentioned below.
- Navigate to Certificates >> Create CSR and click Create.
- In the Create CSR window that opens, fill in the domain details, organization details, choose the key algorithm, key size, signature algorithm, keystore type and specify the validity (days) and keystore password and click Create.
- If you want to generate a CSR from an already existing key, choose 'Create CSR From Private Key' option and specify the key location, password and click Create.
- The CSR will be generated and you can view it from Certificates >> Create CSR tab.
You can also get the CSR signed from Microsoft Certificate Authority directly from PAM360 itself.
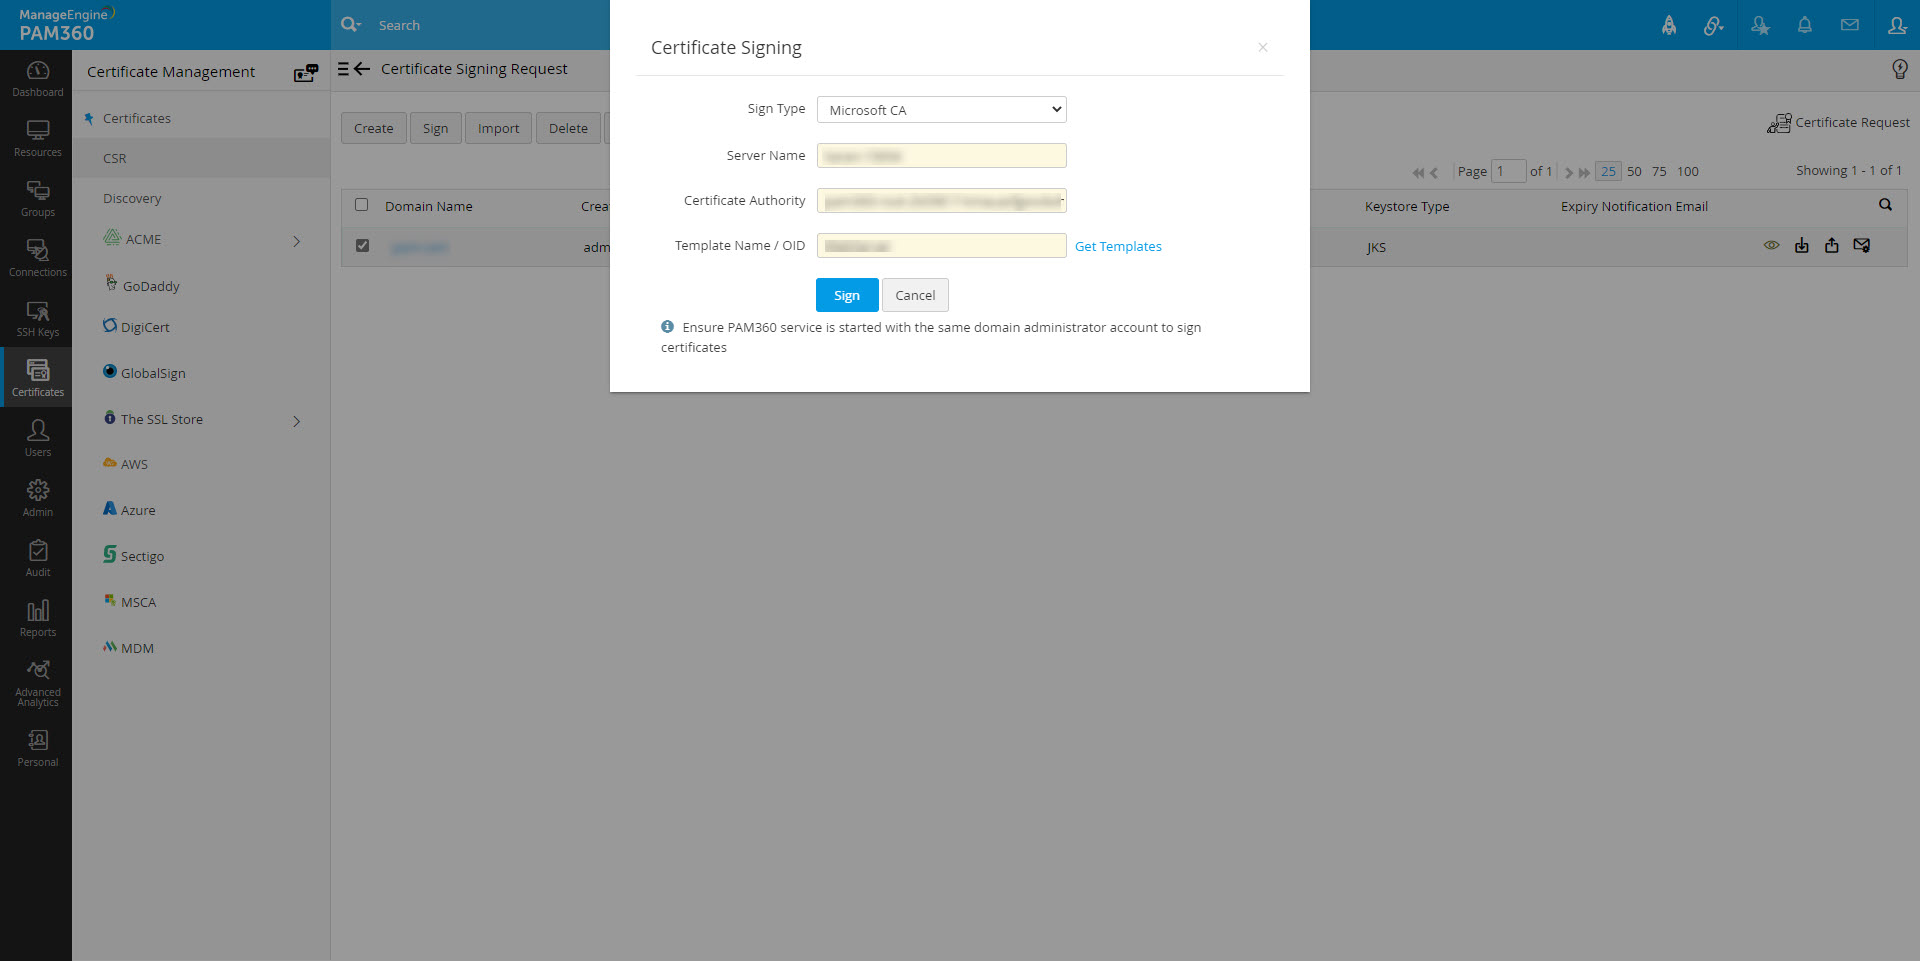
- Navigate to Certificates >> Create CSR tab, select the required CSR and click Sign from the options available above the CSR table view.
- In the dialog box that opens, provide the name of the server that runs the internal certificate authority, CA name and choose the certificate template based on your requirement. Click Sign.
- The CSR is signed and the issued certificate can be viewed from the Certificates tab.
1.7.2 Rediscover SSL Certificates
From PAM360 build 5300 onwards, PAM360 allows you to rediscover SSL certificates from the same source using the server details entered during the previous discovery operation. Follow the below steps to perform certificate rediscovery:
- Navigate to the Certificates tab.
- Select the required certificates and click More >> Re Discover.
The rediscovery operation begins immediately. You can track the discovery status in the Discovery Audit page. Please note that for agent-based discovery to work properly, upgrade Key Manager Plus Agent to version 6000 before commencing the discovery operation.
1.7.3 The Centralized Certificate Repository
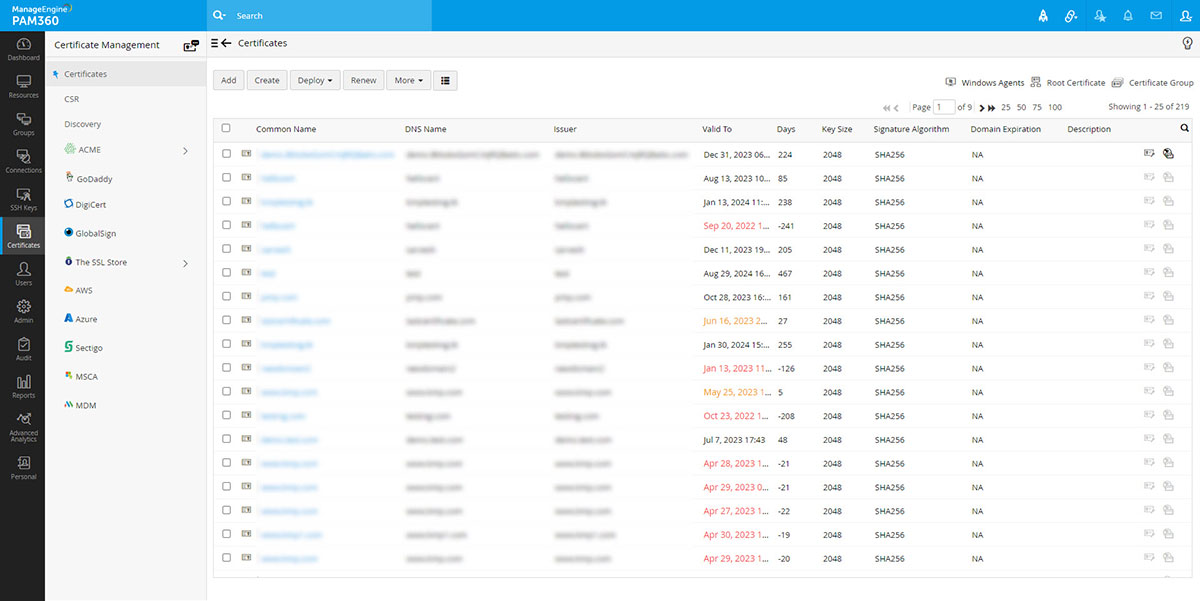
All the discovered SSL certificates, those that are discovered manually as well as those discovered through scheduled discovery operations are automatically added to the centralized repository of PAM360. You can view these certificates under the Certificates >> Certificates option in the user interface.
i. Search SSL Certificates
PAM360 allows you to search certificates using Common Name, DNS Name, Issuer, Key Size, Signature Algorithm, Description, additional fields, etc.
- Navigate to Certificates >> Certificates.
- Click the search icon present on the right corner of the table header and mention the search phrase(s) in the text box(es) that appears.
1.7.4 Export Private Key/Keystore File
PAM360 allows you to identify and export the private keys / keystore files of SSL certificates stored in the certificate repository. You can also export certificates in other formats such as PKCS12/PFX or PEM format. Click the Keystore icon (![]() ) enabled beside the certificates for which the private keys are managed using PAM360.
) enabled beside the certificates for which the private keys are managed using PAM360.
To export the private key or the certificate file:
- Navigate to Certificates >> Certificates.
- Click the Keystore icon (
 ) beside the certificate for which you need to export the private key.
 - From the dropdown, choose from the following options as per your requirement:
- Export Keystore / JKS: The keystore file of the selected certificate will be downloaded.
- Export PKCS12/PFX: The selected certificate will be downloaded in the PFX format.
- Export PEM: The selected certificate will be downloaded in the PEM (Privacy Enhanced Mail) format.
- Export Private Key: The private key of the selected certificate will be downloaded.
- The corresponding certificate is downloaded in the selected format.
1.7.5 Track and Manage Various Certificate Versions
Sometimes, there occurs a situation where you have to use different certificates on different end-servers for the same domain. Under such circumstances, it is necessary for you to track the usage and expiry of all these certificates individually even though they represent a common domain. Monitoring various such certificate versions manually is daunting and error-prone. PAM360 helps you simultaneously track and manage the usage and expiry of various certificate versions from a single window.
To track certificate versions,
- Navigate to Certificates tab.
- Click the certificate history icon (
 ) present in the right corner of the table view, corresponding to the required certificate.
 - In the certificate history window that opens, choose the certificate version you wish to manage and click the certificate settings () icon. Click Manage Certificate.
- The particular certificate version is set for managing and PAM360 starts tracking the usage and expiry individually for that version.
- Repeat the same procedure for all the certificate versions that you wish to manage.
1.7.6 Update Servers with Latest Certificate Versions
In case of wildcard certificates or single SSL certificate deployed to multiple servers, it is necessary to keep track of servers in which the certificate is deployed and also check if the latest certificate version is in use. PAM360 helps you ensure this.
- Navigate to Certificates >> Certificates tab
- Click the Certificate History icon () corresponding to the required certificate
- A window opens listing the various versions of the certificate. Ensure that the latest version of the certificate is set as the main certificate. If not, click the () icon beside the required version to set that version of certificate as main certificate in the PAM360 repository.
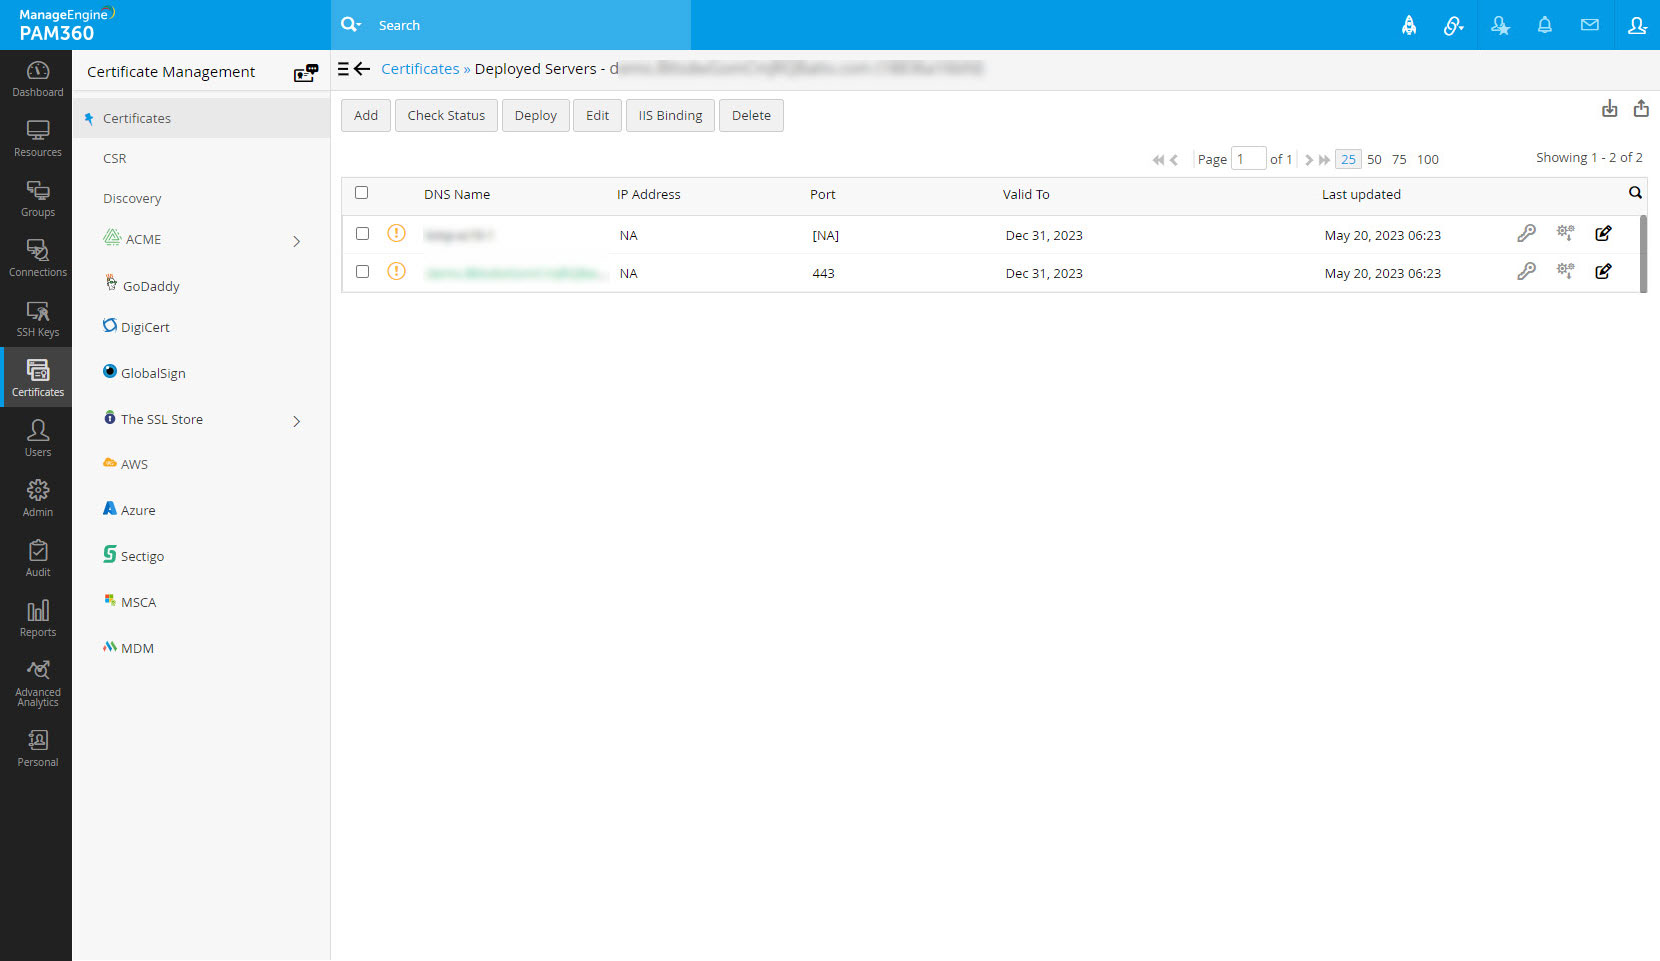
- Then again, navigate to Certificates >> Certificates tab and click multiple servers icon (
 ) corresponding to the required certificate.
 - A window opens listing the servers in which the certificate is deployed along with other information such as IP address, port and certificate validity.
- If any of the servers listed has an older / expired version of the certificate, update it with the latest version immediately. Select the server and then click Deploy. Refer to the detailed deployment procedure here.
- Click edit icon corresponding to the required server to modify the server details.
- Click Add to add a new server.
- In the pop-up that appears, mention the DNS Name, IP Address and Port.
- Click Save.
- Click edit icon corresponding to the required server to modify the server details.
- Select a certificate and click Check Status to check the sync status of the certificate. To know more about Certificate sync status, click here.
Also, you can edit details pertaining to a particular certificate or delete irrelevant certificates by selecting the certificate and clicking the More dropdown.
1.8 Discover SSL Certificates Hosted on AWS (ACM & IAM)
PAM360 enables you to discover, import, and configure expiry notifications for SSL certificates hosted in the following Amazon Web Services: AWS Certificate Manager (ACM) and AWS Identity and Access Management (IAM).
Follow the steps below to discover and import SSL certificates from ACM / IAM into PAM360.
Navigate to Certificates >> Discovery >> AWS.
Step 1: Configure AWS credentials in PAM360
Follow the below steps if you have not added an AWS-IAM resource in PAM360:
To add your AWS credentials in PAM360,
- Click Manage AWS Credential and click Add.
- In the Create AWS Credentials window that opens, provide the Credential Name, Description, Access Key and Secret Key.
- Use the Test Login option and check if the login is successful. You will be notified if the login is successful
- Then click Save. The credentials are successfully saved in PAM360.
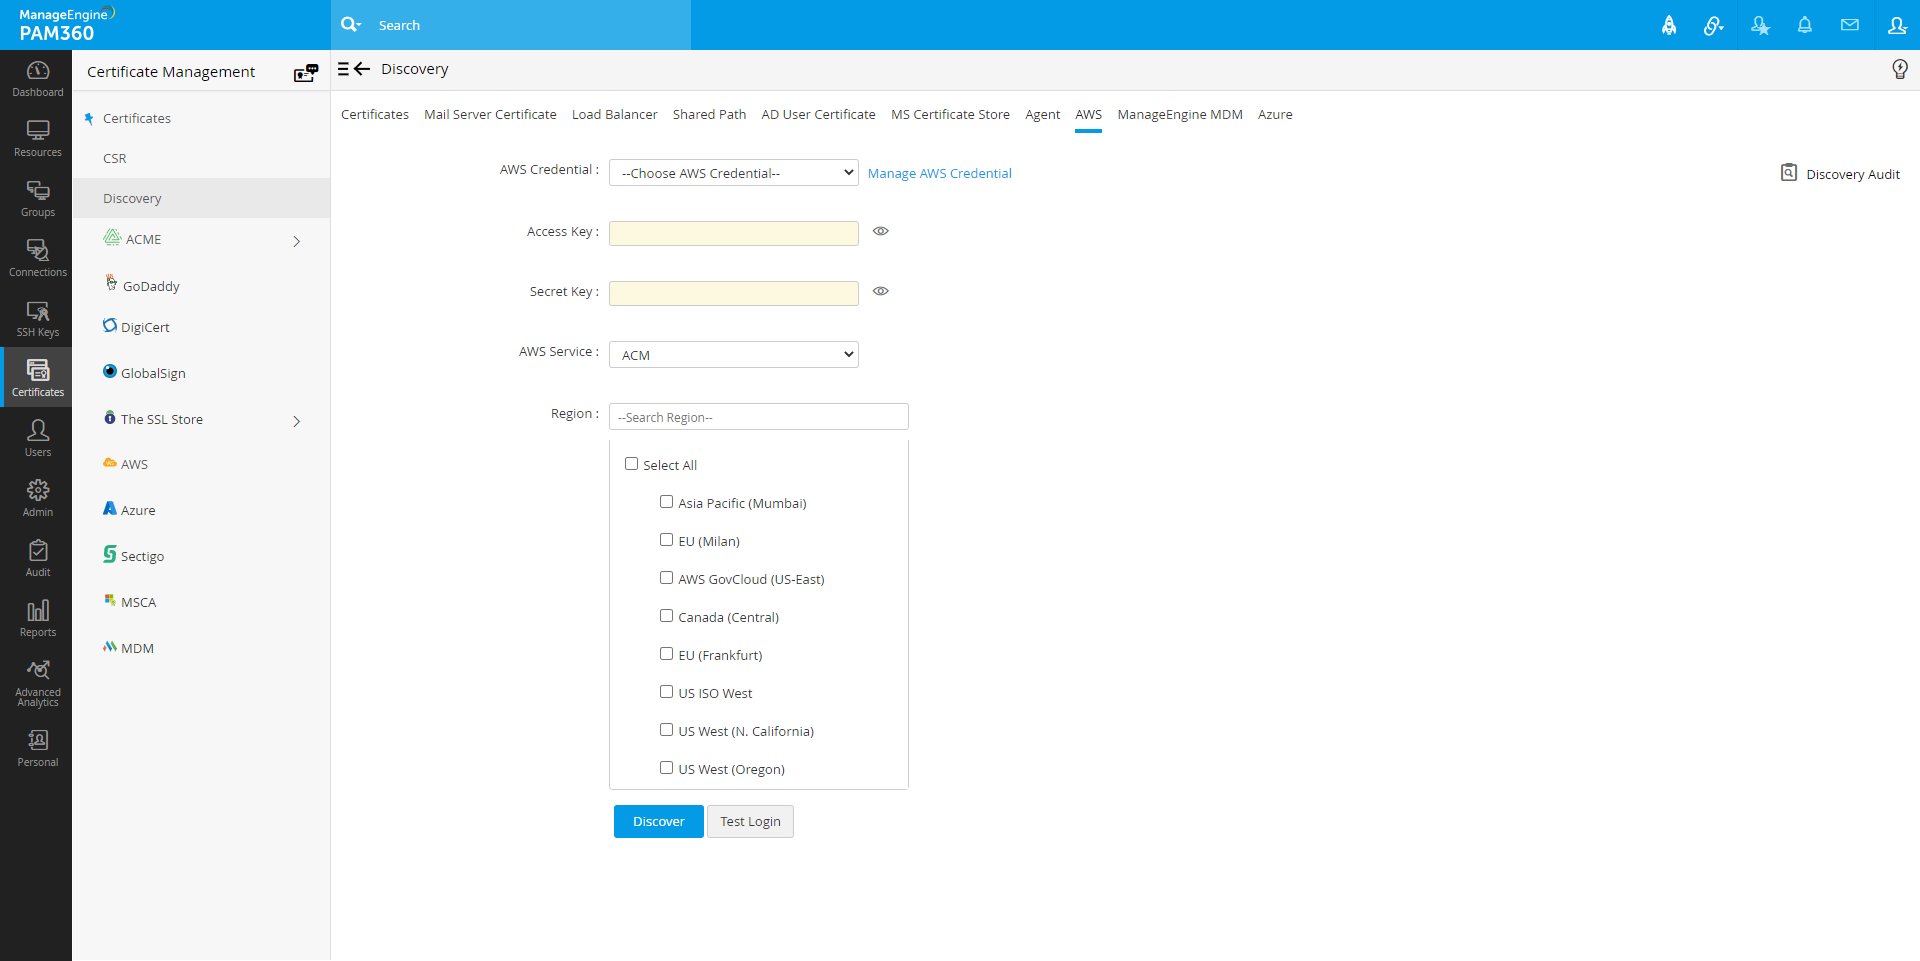
- Now, navigate to Certificates >> Discovery >> AWS and choose the appropriate AWS Credentials from the drop-down or provide your Access Key and Secret Key manually.
If you have already added an AWS-IAM resource in PAM360,
- Choose if you want to Specify the access key and secret key manually or Use an access key and secret key stored in PAM360.
- If you have chosen Specify the access key and secret key manually, enter your Access Key and Secret Key.
- If you have chosen Use an access key and secret key stored in PAM360, select the Resource Name, Access Key and Secret Key from the drop-down.
Step 2: Discovery and Import
- Choose the required AWS Service from which certificates need to be imported: ACM or IAM.
- To import certificates from ACM, select ACM under AWS service and choose the service Region.
- Click Discover.
- Certificates are discovered from resources in the selected region and imported into Key Manager Plus.
- To import certificates from IAM, specify the required AWS User Name(s) or use the List AWSUser Names option to retrieve the usernames. Choose the required usernames and click Discover.
- You can also choose to import server certificates for the corresponding AWS users by checking the Include Server Certificate option.
User certificates are imported into PAM360.
1.9 Discover SSL Certificates using ManageEngine Mobile Device Manager Plus
PAM360 integrates with ManageEngine Mobile Device Manager Plus (MDM). Once the integration is done, you can discover and import SSL certificates from the devices managed through your MDM server and store the SSL certificates in the PAM360 repository. You can also deploy SSL certificates from PAM360 to the mobile devices listed in your MDM environment. Refer to this document for steps on how to discover certificates using ManageEngine MDM.
2. Create Self-Signed Certificates
PAM360 allows administrators to create their own self-signed certificates using Java keytool. These certificates are automatically imported into the PAM360 repository on successful creation.
To create a self-signed certificate using PAM360:
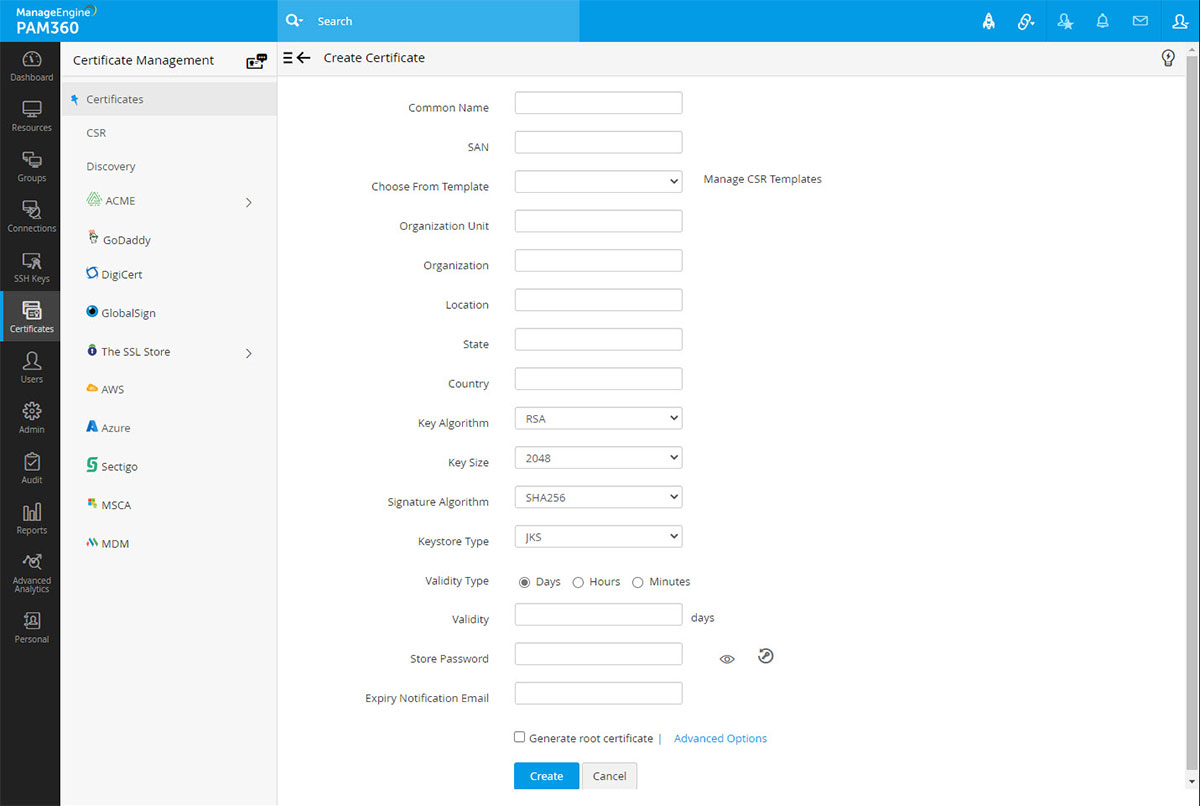
- Navigate to the Certificates >> Certificates >> Create.
- Enter the details of the organization and certificate validity, and select the key algorithm and length, signature algorithm, and enter a keystore password in the Create certificate tab.
- Click the Create button. You will be redirected to the certificate window where the certificate content is displayed.
- To create an ephemeral certificate with limited validity period, choose the Validity Type as Hours or Minutes and provide the validity period. The certificate will expire after the specified time.
- Mention the email address to which the Expiry Notification Email should be sent.
- You can denominate the certificate to be generated as a root certificate by enabling the Generate root certificate check-box.
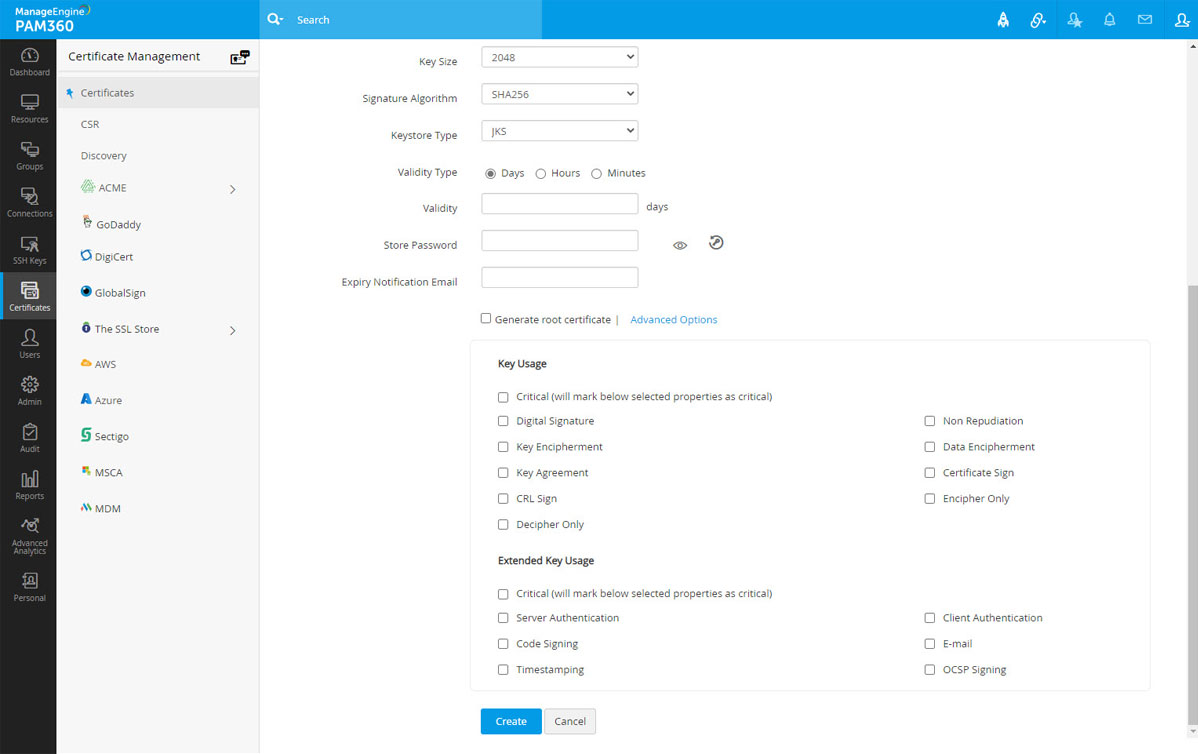
- To add optional properties to the new certificate, click Advanced Options to expand the menu. Here, there are two categories of options, Key Usage and Extended Key Usage. Select the required options to set the preferred flags for the certificate to denote the purpose for which the new certificate may be used. The Key Usage options include Non Repudiation, Digital Signature, Data or Key Encipherment, Server/Client Authentication etc. You can choose the properties and mark them as critical by selecting the Critical checkbox.
- Click the Create button. You will be redirected to the certificate window where the certificate content is displayed.
- You can copy the certificate content, or export the certificate to required email or system.
- Email – Select this check box to send the certificate file via email to the specified mail id.
- Export – Select this check box to export the file to your system.
- Both the options take effect once you click Save.
- Click the Save button to save the certificate in the PAM360 repository, and export the certificate file, if opted in the earlier step.
(Applicable from build 5000 onwards)
Note:
Apart from having a wildcard certificate name in the Common Name field, you can add the wildcard name in the SAN field while creating a self-signed certificate. With wildcard certificates, one can secure an unlimited number of subdomains for a registered base-domain.
For example, consider the base-domain zoho.com, a wildcard certificate for *.zoho.com can secure any-subdomain.zoho.com. The asterisk (*) is the wildcard that corresponds to any valid subdomain.
3. Generate CSRs
To generate a CSR using Java keytool from PAM360:
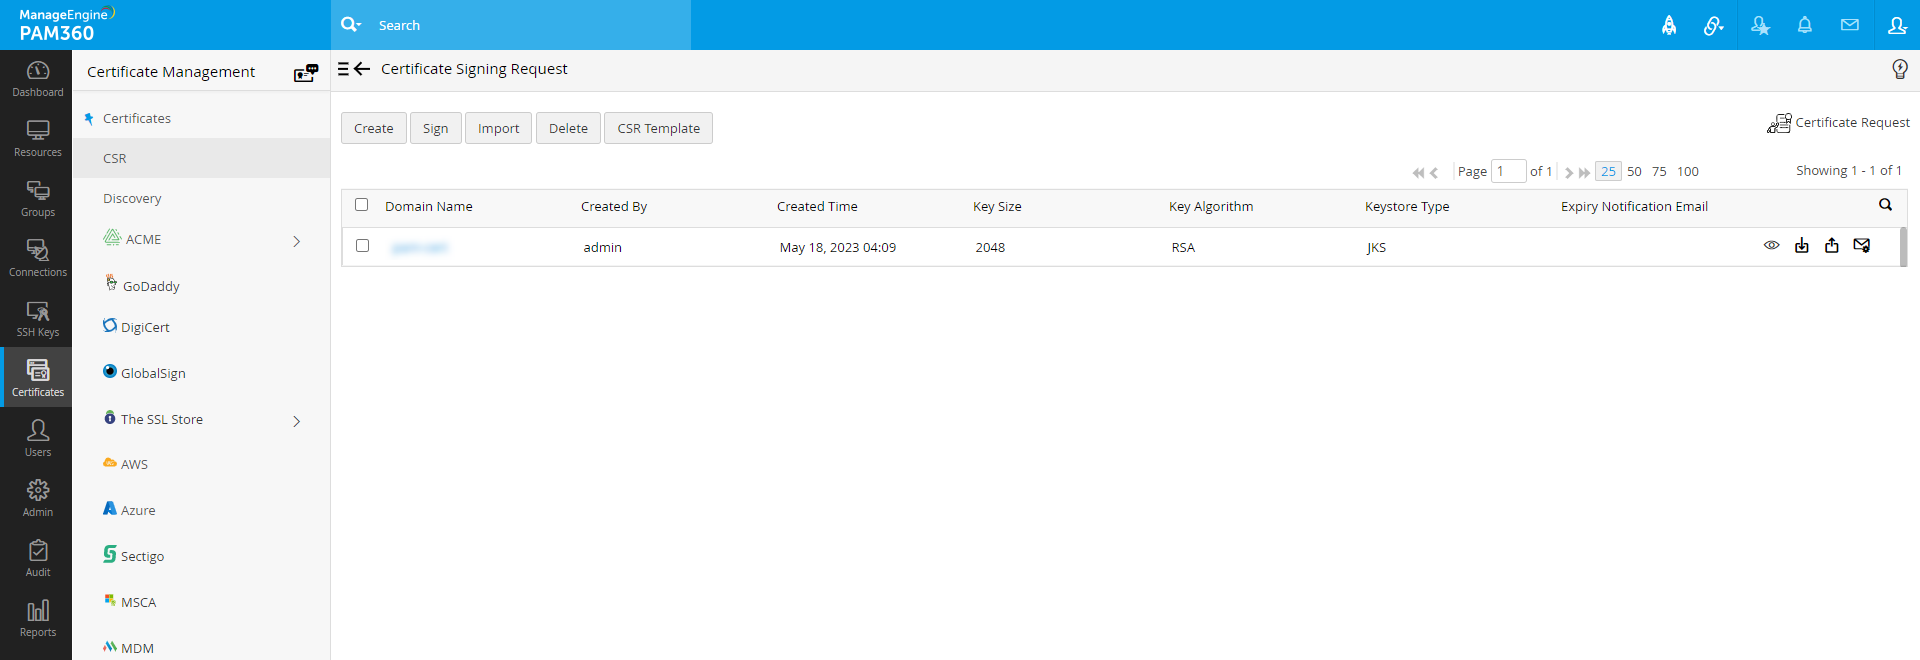
- Navigate to the Certificates >> CSR. You will see all the available CSRs in a list view along with their details such as Domain Name, Created By, Created Time, Key Size, Key Algorithm, etc.
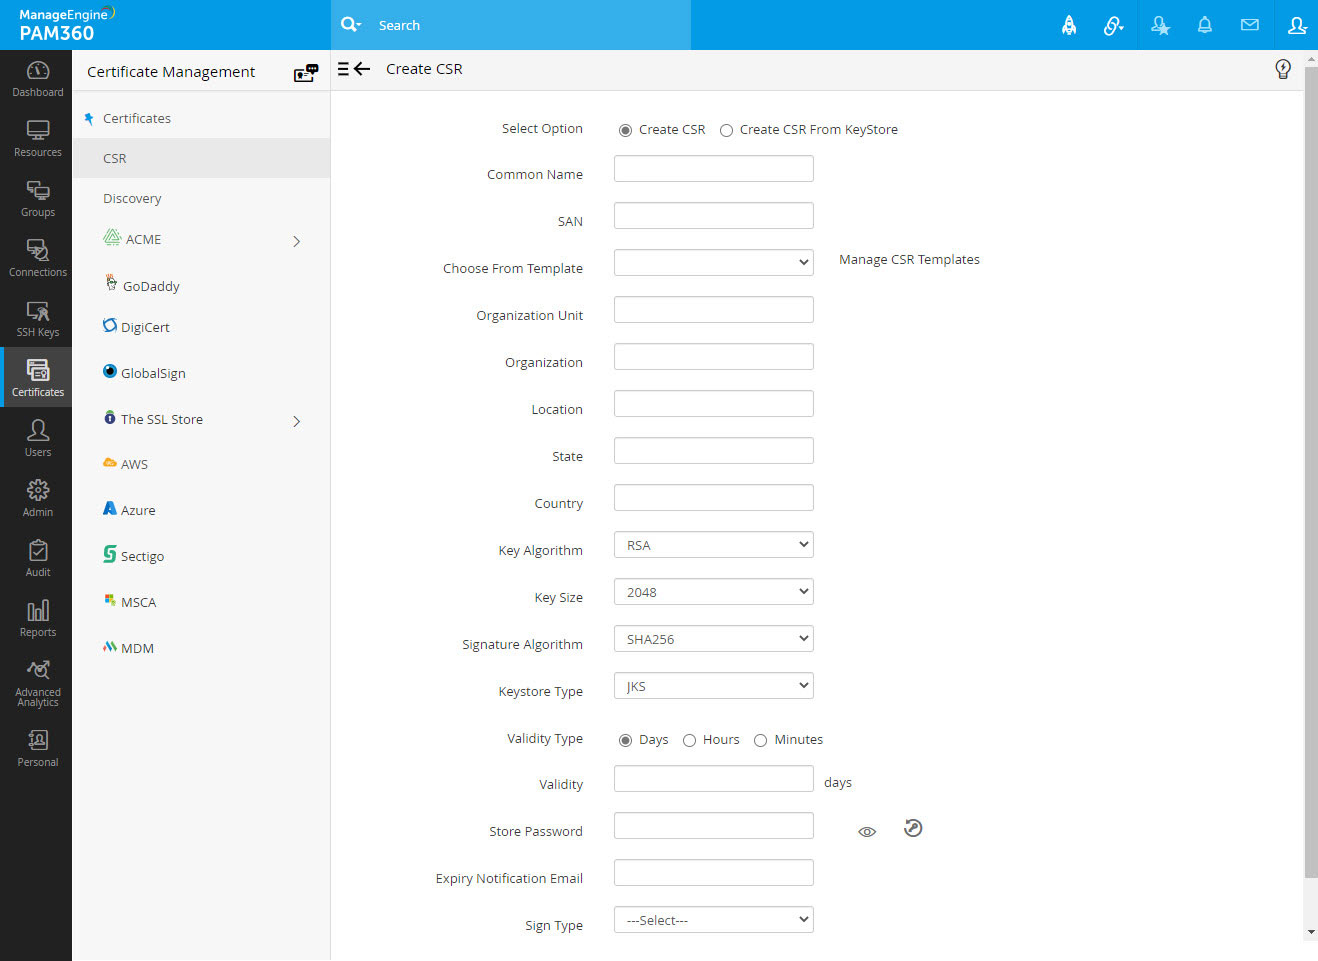
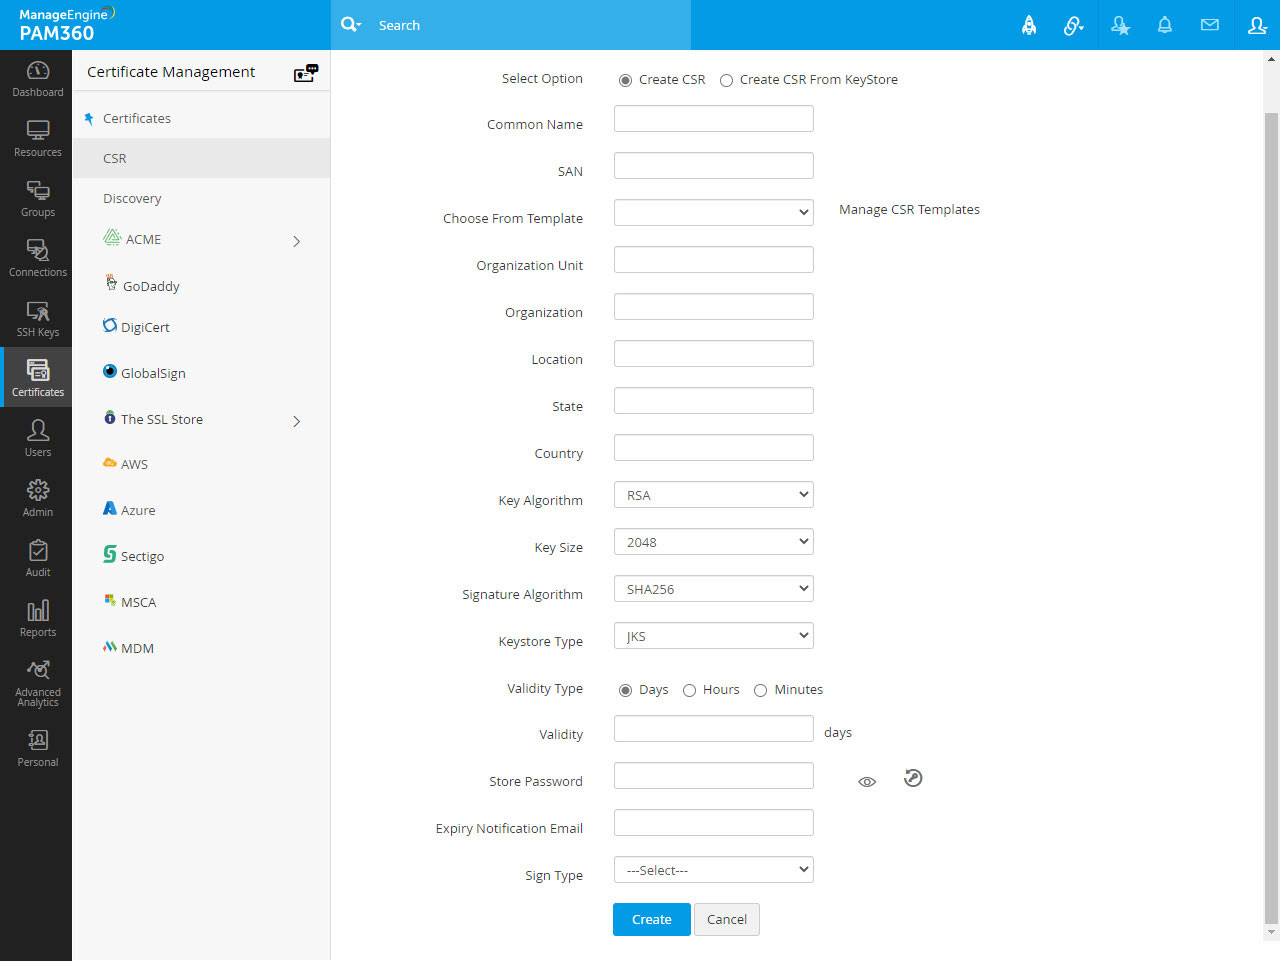
- Click Create to generate a new CSR. In the form displayed, do the following:
- Choose between Create CSR manually or Create CSR from Keystore. You can also choose from a CSR template. Click the Manage CSR Templates link and choose one.
- If you choose to Create CSR from Keystore:
- Select the Keystore file by clicking Browse.
- Enter the Private Key Password and click Create.
- If you choose to Create CSR manually:
- Specify the required details such as Common Name, SAN, Organization Unit, Organization, Location, State and Country.
- Select the Key Algorithm, Key Size, Signature Algorithm, and Keystore Type.
- Choose a Validity Type (Days, Hours or Minutes) and mention the Validity.
- Enter the Store Password and Expiry Notification Email address. Click the Generate Password icon to generate a key store password.
- Select the Sign Type and enter the required details.
- You can also sign your CSR later by not choosing the Sign Type now. To know more about signing the CSR later, click here.
- Click Create. You will be redirected to a CSR window where the CSR content is displayed.
You have successfully created a CSR and it has been added to the list view.
(Applicable from build 5000 onwards)
Note:
Apart from having a wildcard certificate name in the Common Name field, you can add the wildcard name in the SAN field while creating a self-signed certificate. With wildcard certificates, one can secure an unlimited number of subdomains for a registered base-domain.
For example, consider the base-domain zoho.com, a wildcard certificate for *.zoho.com can secure any-subdomain.zoho.com. The asterisk (*) is the wildcard that corresponds to any valid subdomain.
3.1 Managing CSR
- You can view the saved CSR from Certificates >> Create CSR tab.
- Show Passphrase: The show passphrase icon (
 ) corresponding to every CSR allows administrators to view the keystore passwords of respective CSR files.
 - Export: You can export and mail the CSR to a specified mail id by using the icon (
 ) in the CSR displayed in the list view.
 - Import: If you choose to import a CSR, click Import. A pop-up appears.
- Browse and Select a CSR file and Select a Key file.
- Enter the Private Key Password and click Import.
- Your CSR has been successfully imported and can be viewed in the list view.
- PAM360 automatically pins the certificate file with its corresponding private key and adds it to its centralized repository.
- Delete: To Delete a CSR, select the CSR you wish to delete and click Delete.
- In the pop-up that appears, click OK.
- You have successfully deleted the selected CSR.
- CSR Template: Click CSR Template to add, delete or manage the templates. These templates after generated can be used while generating CSR’s.
- RSA – 1024, 2048, or 4096 bit keys; & SHA-2 (256, 384, or 512 bit) signature.
- DSA – 512, or 1024 bit keys; & SHA-1 (160 bit) signature.
- EC – 128, or 256 bit keys; & SHA-2 (256, 384, or 512 bit) signature.
Note: Self-signed certificates and CSRs can be generated using RSA / DSA / EC key algorithms and SHA signature algorithm as per the details below:
4. Certificate Signing
PAM360 provides the option to sign and issue certificates to all clients in your network either from your Microsoft Certificate Authority or using a custom root CA certificate that is trusted within your environment.
To request and acquire certificates from Local CA from PAM360, you have to initially generate a CSR, then get it signed from the local certificate authority using the steps mentioned below.
There are three ways to sign your certificates:
- MS Certificate Authority
- MS CA with agent
- Sign with Root
Navigate to Certificates >> CSR.
4.1 Microsoft Certificate Authority
You can get the CSR signed from Microsoft Certificate Authority from PAM360.
- Select the required CSR and click Sign from the top menu.
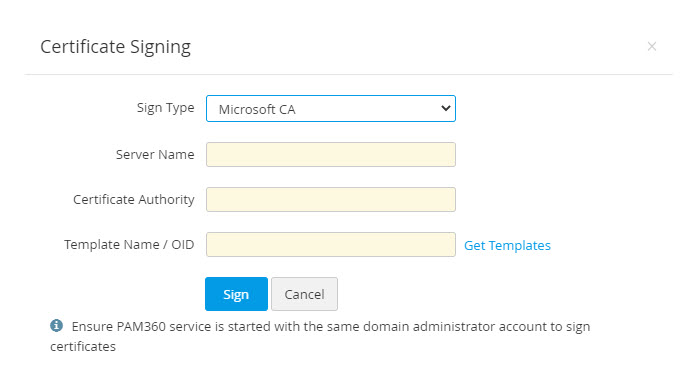
- In the pop-up that opens, select the Sign Type as Microsoft Certificate Authority.
- Mention the Server Name that runs the internal CA and also the Certificate Authority name.
- Select the Certificate Template based on your requirement or select any of the predefined templates by clicking the Get Template link and click Sign.
The CSR is signed and the issued certificate can be viewed from Certificates >> Certificates.
Notes:
- Start PAM360 using your domain administrator account to begin management of certificates from Microsoft Certificate Store and those issued by your Local CA. If you use a domain service account to run PAM360, make sure that you have configured it in your local admin group beforehand.
- During MS Certificate Store discovery, Get Stores option will list all stores available in the local host if the Server Name field is left empty.
- For MS CA auto-renewal to take effect, the certificate(s) need to be of type Microsoft CA. For manually added certificates, the certificate type needs to be changed to Microsoft CA using Edit option from More top menu.
4.2 Microsoft CA with Agent
- Select the required CSR from the list view and click Sign from the top menu.
- In the pop-up that appears,
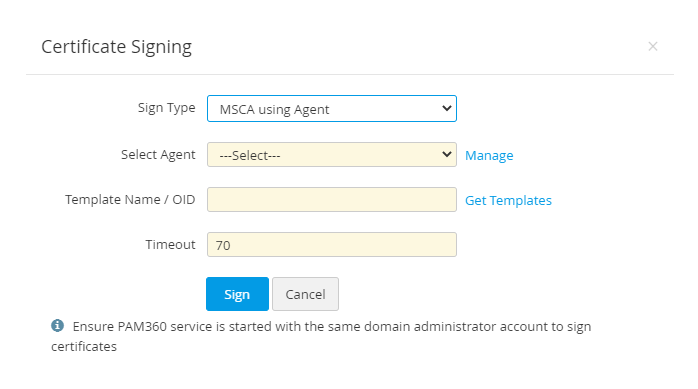
- Select the Sign Type as Microsoft CA with Agent.
- Select the Agent from the list available in the drop-down. You can also Manage the agent by clicking the link. To know more about agents, click here.
- Specify the Certificate Template or click Get Template to get new templates.
- Mention the agent Time out in seconds within which the agent should respond. If the agent doesn't respond within the timeout period, the operation will be audited as failed.
- Click Sign.
The CSR is signed and the issued certificate can be viewed from Certificates >> Certificates.
4.3 Sign with Root
PAM360 provides the option to sign and issue certificates to all clients in your network either from your Microsoft Certificate Authority or using a custom root CA certificate that is trusted within your environment.
- Create a custom root CA
- Sign certificates with the custom root CA
- Deploy the signed certificates to target systems
4.3.1 Create a custom root CA
To sign locally generated certificate requests with the root CA certificate, you have to initially create a custom root CA.
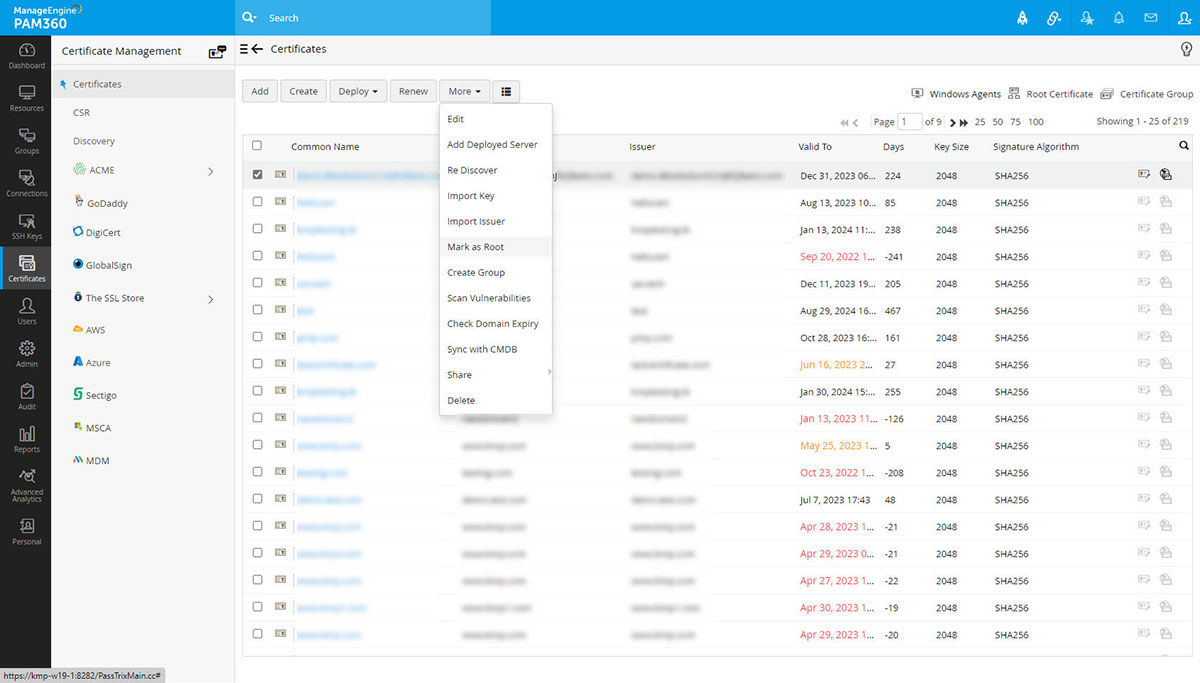
- Navigate to Certificates >> Certificates tab.
- Select a certificate and click More >> Mark as Root from the top menu.
The chosen certificate is successfully denominated as a root CA certificate and is listed under the Root Certificate tab. You can then use this certificate to sign locally generated certificate requests.
Note: You can also generate new root CA certificates from PAM360 by enabling Generate root certificate check-box while creating a certificate from Certificates >> Certificates >> Create.
4.3.2 Sign certificates with the custom root CA
To sign certificates with the custom root CA, generate a certificate signing request (CSR) and then sign it using the root certificate.
- Select the CSR and click Sign from the top menu.
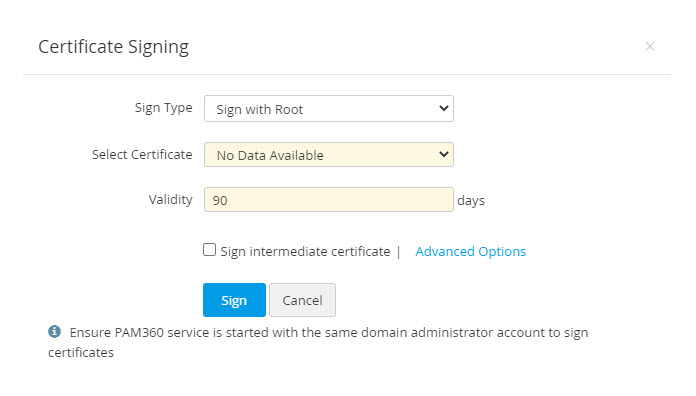
- Select the Sign Type as Sign with Root.
- Select the Root Certificate and specify the Validity in days. Click Sign.
- Select checkbox to Sign intermediate certificate. This allows users to sign the certificate on behalf of Root CA.
- To add optional properties to the new certificate, click Advanced Options to expand the menu. Here, there are two categories of options, Key Usage and Extended Key Usage. Select the required options to set the preferred flags for the certificate to denote the purpose for which the new certificate may be used. The Key Usage options include Non Repudiation, Digital Signature, Data or Key Encipherment, Server/Client Authentication etc. You can choose the properties and mark them as critical by selecting the Critical checkbox.
- Click Sign.
The certificate is signed based on the selected root certificate and is listed under Certificates >> Certificates tab.
Also, you can use the root CA certificate to simultaneously generate and sign certificates to user groups in bulk directly from PAM360.
- Navigate to Certificate and click Root Certificate on top right corner of the window.
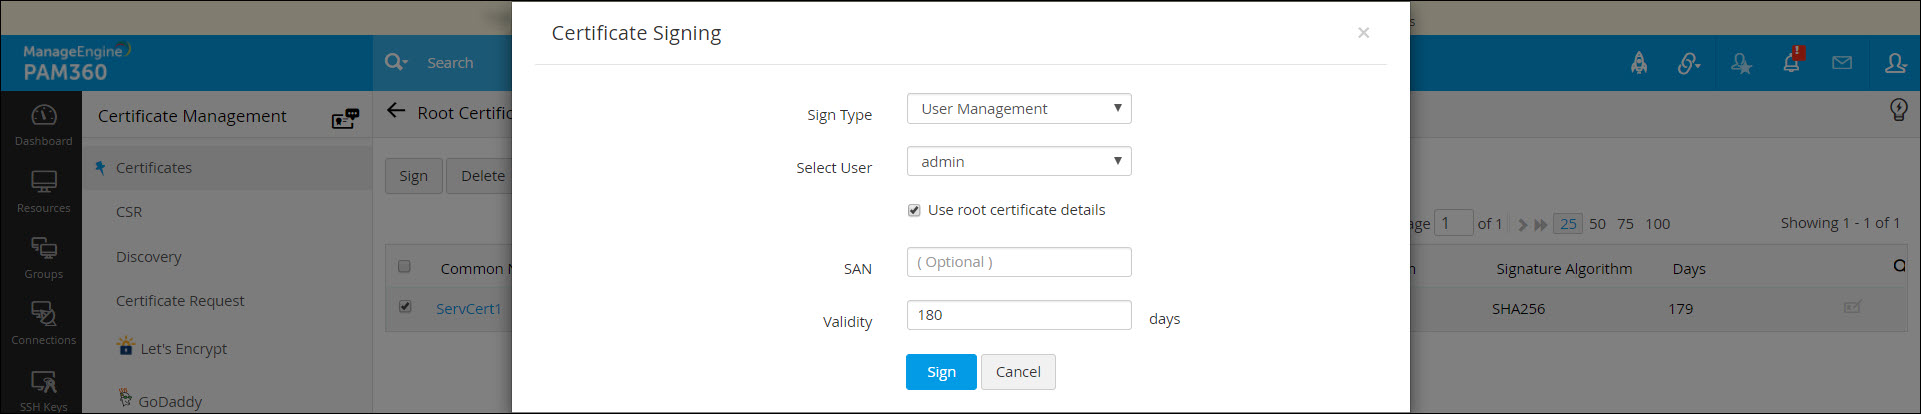
- Select the required root CA certificate and click Sign. In the pop-up that opens, choose the sign type, user / user groups to which certificates have to be created and deployed, mention the SAN and validity (in days).
- The sign type User Management allows you to generate and sign certificates for user accounts in PAM360.
- Select the user account for which you need to generate a certificate.
- By default, the user certificates inherit the same parameters as that of the root certificate. You can change it by unselecting the Use root certificate details option.
- After filling in the details, click Sign.
The certificate is signed and you can find listed in PAM360's certificate repository.
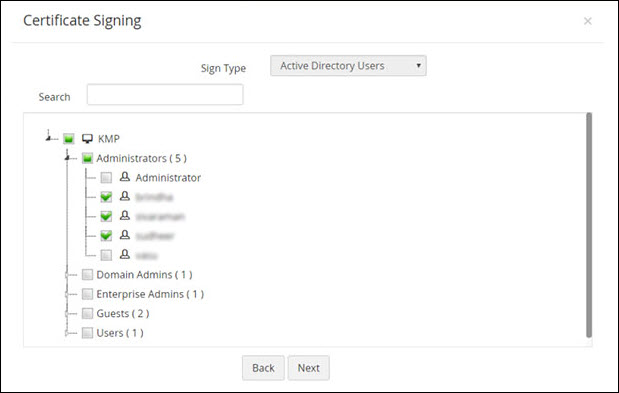
The sign type Active Directory Users allows you to generate and sign certificates to user accounts mapped to the Active Directory within your network environment.
- Select the Domain Name and provide the primary domain controller address, username and password.
- Choose import type Single and specify the user groups or use Groups/OU tree import type to choose the users or user groups for which certificates need to be created.
- After selecting the users, enter the certificate validity in days. By default, the user certificates inherit the same parameters as that of the root certificate. You can change it by unselecting the Use root certificate details option.
- After filling in the details click Sign.
- This will generate certificates for the selected users which will be listed in PAM360' certificate repository.
4.3.3 Deploy the signed certificate to target systems
After signing the certificate requests and obtaining the certificate, you have to deploy them to the necessary end-servers. Refer to this section of help for step-by-step explanation on certificate deployment.
Note : When signing certificates with custom root CA for web-applications, make sure all the browsers in your network are configured to trust the root CA certificate in order to avoid security error messages.
5. Import and Export Certificates
5.1 Allowed Certificate Types
PAM360 allows you to import and export the following certificate types:
- .cer
- .crt
- .pem
- .der
- .p7b
- .pfx
- .p12
- .pkcs12
- .jks
- .keystore
5.2 Steps to Import the Certificates in your Network
In addition to certificate discovery, PAM360 provides a few other ways in which you can manually add SSL certificates into the repository. To do so, follow the below steps:
- Navigate to the SSL >> Certificates tab and click the Add button.
- The Add Certificate window displays the following options:
- Certificates – Browse and import the required certificate file directly from your system.
- Certificate Content – Copy the content of the required certificate file and paste it in the text box.
- Keystore Based – Import all individual certificates available in a Keystore simultaneously. Upload the required Keystore file and enter its corresponding password (if any).
- Certificate Details – Browse and import the .csv file with the required certificate details.
- Click Add. The certificates or certificate details will be imported to the PAM360 repository.
5.3 Steps to Import Issuer Certificates
PAM360 allows you to import issuer certificates into the repository and build a complete certificate chain in the product.
- Navigate to Certificates >> Certificates. Select the required end certificate.
- Under the More dropdown, select Import Issuer.
- In the pop-up that appears, Browse and add the issuer certificate andh click Import.
- The additional issuer certificates you add will be appended to the existing SSL certificate in the repository based on the issuer name. To download the complete chain with the private key, export the certificate in JKS, PKCS, or PEM formats.
5.4 Steps to Export the Certificates in your Network
- Navigate to Certificates >> Certificates.
- In the list view, click the certificate you want to export.
- In the certificate details window, click Export on the top right corner and select the required format in the which you want to export the certificate.
- The certificate will be downloaded to your machine in the selected format.
6. Certificate Renewal
The Certificates tab in PAM360 is a centralized console where all types of SSL certificates such as Self Signed, Root Signed, Microsoft CA Signed, certificates issued by third-party CAs etc., are consolidated and displayed. Through the Renew option, these certificate types can be renewed in the Certificates tab directly. These renewed certificates will automatically inherit the deployed servers and their credentials. For certificates issued by third-party CAs, the renewal will be initiated and redirected to the respective CA's tab. To proceed further, follow the below steps:
- Navigate to Certificates >> Certificates.
- There are three types of certificate renewal:
- Self Signed certificate renewal
- Root Signed certificate renewal
- Microsoft CA Signed/Signed with Agent certificate renewal
i. Self Signed Certificate Renewal
To renew a Self Signed certificate, follow the below steps:
- Select a Self Signed certificate and click Renew at the top.
- The renewal type will be Self Signed by default.
- Specify the number of days for which the certificate shall be valid in the Validity field. Click Renew.
The certificate will be renewed successfully and the Valid To date will change according to the new validity period specified.
ii. Root Signed Certificate Renewal
To renew a Root Signed certificate, follow the below steps:
- Select a Root Signed certificate and click Renew at the top.
- The renewal type will be Renew with Root by default and the Issuer name will be auto populated in the Root Name field.
- Specify the number of days for which the certificate shall be valid in the Validity field. Click Renew.
The certificate will be renewed successfully and the Valid To date will change according to the new validity period specified.
iii. Microsoft CA Signed/Signed with Agent Certificate Renewal
To renew a Microsoft CA signed certificate, follow the below steps:
- Select a Microsoft CA Signed certificate and click Renew at the top.
- If the certificate does not have a private key, PAM360 allows you to create a new private key. Click OK in the pop-up that appears.
- Attributes such as Renewal Type, Server Name, Template Name / OID, Certificate Authority will be auto populated from the certificate details. The Server Name is the name of the Microsoft CA server which signed the certificate. Certificate Authority is the CA service that runs in the specified Microsoft CA server.
- For certificates signed by Microsoft CA directly or using the KMP agent, validity days will be taken from the Microsoft CA server and therefore it cannot be entered manually during renewal. These type of certificates will be renewed only till the date specified in the the Microsoft CA server.
In addition to the above types, third-party CA signed certificates can also be renewed using this renewal option. Follow the same procedure to initiate renewal and PAM360 will redirect the renewal request to the respective third-party CA. Follow the steps detailed in the next section to learn how to set up auto-renewal for certificates in PAM360.
6.1 Auto Renewal
Certificates issued by Local CA can be renewed automatically from the Admin page in PAM360.
To enable auto-renewal of Local CA certificates, follow the below steps:
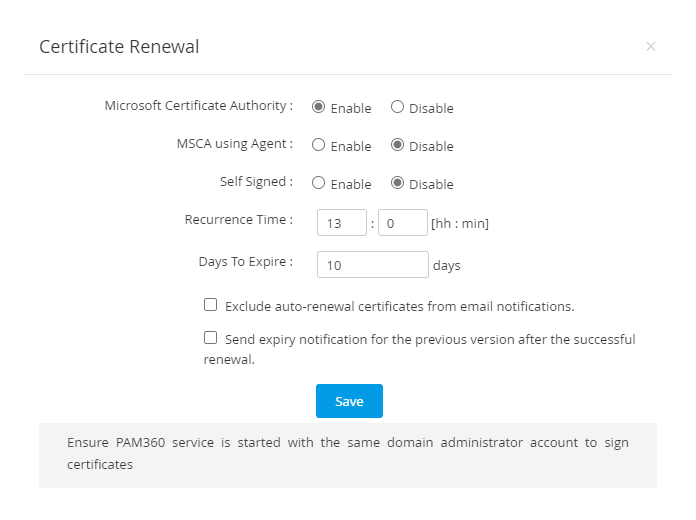
- Navigate to Admin >> SSL Certificates >> Certificate Renewal.
- Enable Microsoft Certificate Authority, MSCA using Agent or Self Signed and specify the Recurrence Time.
- Certificates that have already expired and certificates due to expiry in 10 days or less are automatically renewed and updated in the certificate repository.
- The certificates that are due to expire in the number of days mentioned in the Days to Expire field will also be auto-renewed.
- Select the checkbox to Exclude auto-renewal certificates from email notifications. This allows the certificates marked for auto-renewal to be excluded from the email notifications even if they fall under the expiry notification configuration.
- Select the checkbox to Send Expiry Notification for the Previous version after successful Renewal.
- Click Save.
- After successful auto-renewal, the previous version of the certificate will be listed under Certificate History.
7. Certificate History
PAM360 allows you to group the certificates under a common name. To enable this,
- Navigate to Admin >> SSL Certificates >> Certificate History.
- Choose Enable or Disable the Group Certificates by CommonName option.
- Enabling the option will group the certificates under one Common Name.
- Disabling this option will create new certificates based on the unique Serial Numbers assigned to the certificates.
- To view these certificates, navigate to Certificates >> Certificates and enable Certificate History from column chooser.
- Now, click the certificate history icon corresponding to the required certificate to view the certificates.
Notes: On certificate renewal, the older version of the renewed certificate will be moved to Certificate History.
8. Certificates Sync Status
PAM360 allows users to perform periodic and automatic checks on the synchronization status on the SSL certificates deployed to multiple servers.
When enabled, PAM360 gives you options to check for out-of-sync servers and delete the servers in which there is a certificate mismatch. Follow the below steps to enable certificate sync status check:
- Navigate to Admin >> SSL Certificates >> Certificates Sync Status.
- Click Enable and enter a recurrence time interval in hours or minutes.
- Check only the Non-Sync servers - select this option to check and consolidate only the out-of-sync servers.
- Delete the server if Non-Sync - select this option to delete the servers that are found to have a certificate mismatch after the synchronization check.
- Click Disable to stop the synchronization check.
9. Edit and Delete Certificates
9.1 Steps to Edit a Certificate from PAM360 Repository
To edit a certificate from PAM360 repository:
- Navigate to the Certificates >> Certificates.
- Select the certificate to be edited, click More and select Edit from the drop-down.
- In the Edit Certificate pop-up that appears, edit the DNS Name, Port, Description, Expiry Notification Email, and Type.
- You can choose to Deploy Certificate on Auto Renewal.
- Click Save.
Note: You will be able to deploy certificate to all servers on auto renewal only if the user credentials are available.
9.2 Steps to Delete a Certificate from PAM360 Repository
You can delete the certificates that are currently not in use. To delete a certificate from PAM360 repository:
- Navigate to the Certificates >> Certificates.
- Select the certificates.
- Click More and select Delete from the drop-down.
- In the pop-up that appears, select the checkbox to Add selected certificates to 'Excluded certificates' and mention the Reason.
- Click OK in the pop-up that appears.
10. Certificate Requests
The certificate request workflow is as follows:
- Add certificate request
- Close certificate request
10.1 Add Certificate Request
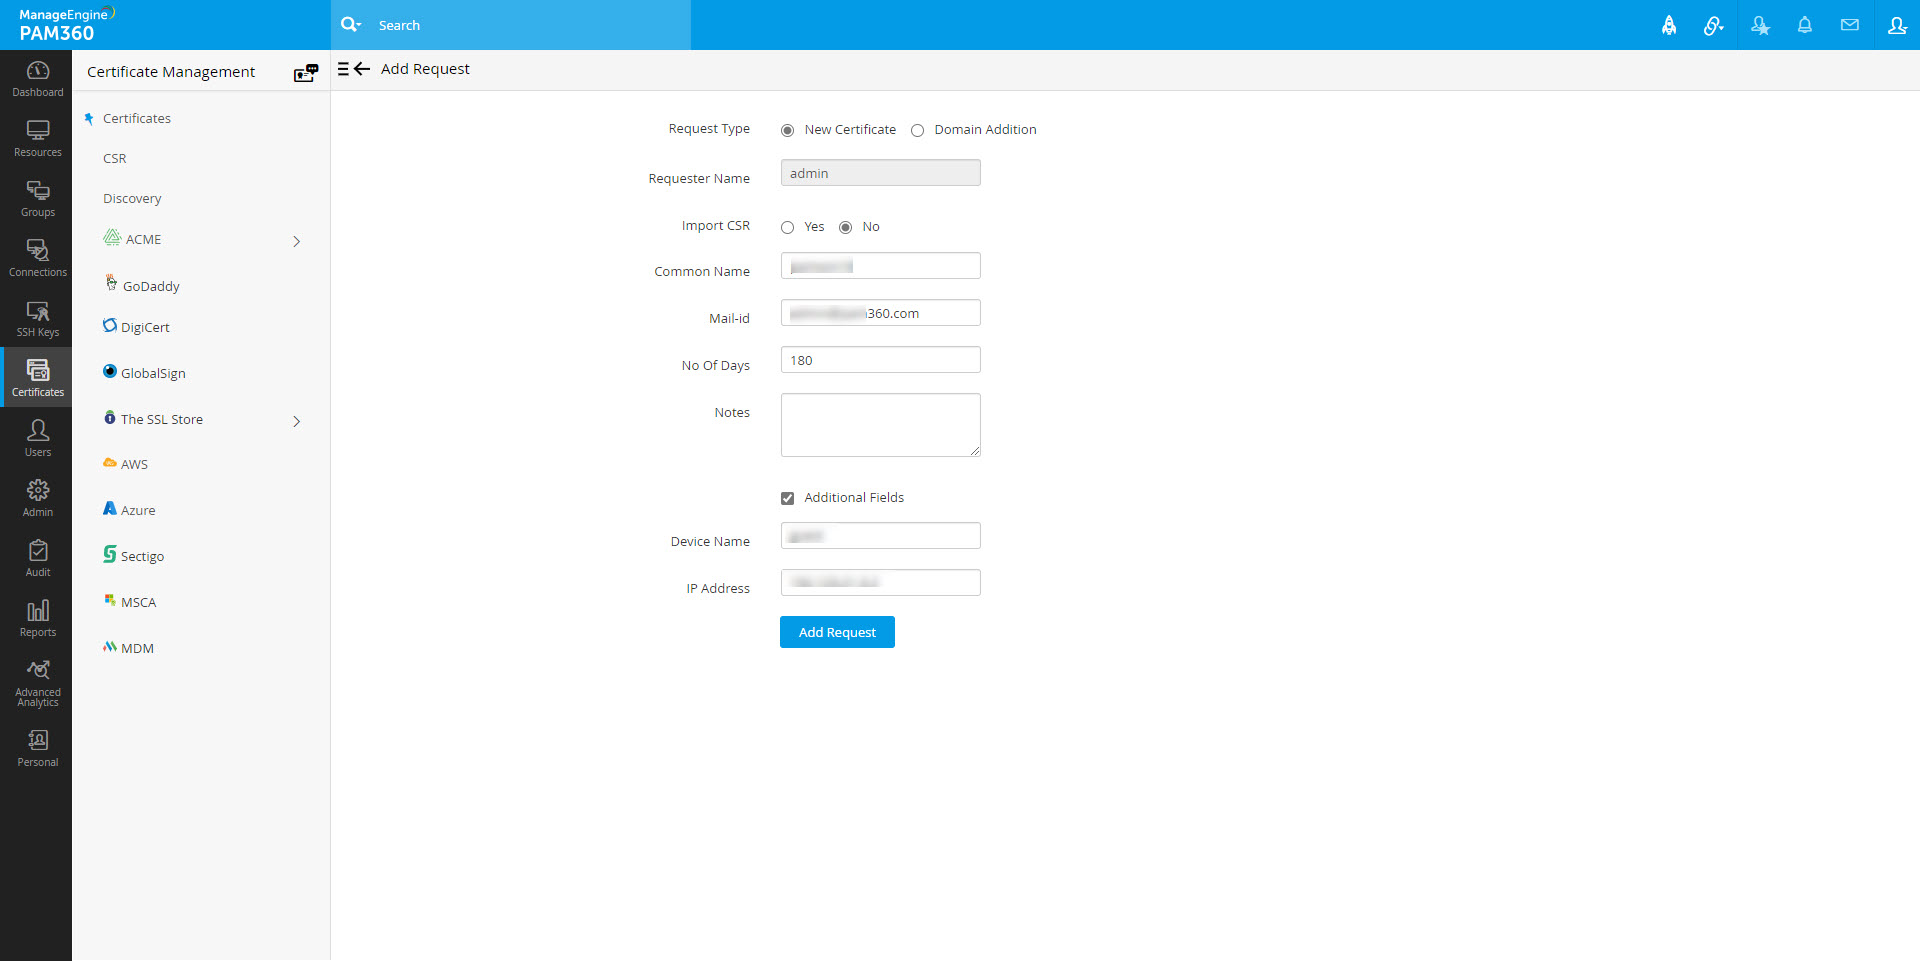
To add requests for new certificates or addition of sub-domains to existing certificates, in PAM360:
- Navigate to the Certificates >> Certificate request.
- Click the Add Request button.
- Select the type of request – New Certificate or domain addition.
- New Certificate – Attach a CSR to your request (optional) and a domain name for the new certificate.
- Add Domain – Enter the name of the new domain and select a parent domain from the certificates added to the PAM360 repository.
- Enter the mail addresses to which you would like to send the request and specify the certificate validity period. These mail addresses can be that of an administrator, an intermediary who handles certificate requests, or even your help desk software to raise the certificate request as a ticket.
- Click Additional fields to add additional information such as device name and IP address
- Click the Add Request button to add it to the list of request in the Certificate Request tab and to send the same to the specified email addresses.
10.2 Certificate Request Status
A certificate request is in either of the following statuses.
- Open
- Closed
When a certificate request is raised, it is automatically elevated to the Open state. The request details can be viewed from Certificates >> Certificate Request, on clicking the domain name of the request.
10.3 Terminate the Certificate Request Life-cycle
- Navigate to the Certificates >> Certificate Request.
- Click the Open status link in the right corner of the table against the required open request process.
- In the Close Request window, add an optional annotation, and attach the certificate issued (optional), specify the e-mail ids of users to whom the certificate is to be sent and click the Save & Close button. Once you click the button, the request is automatically moved to the Closed state.
- If a SSL certificate is attached while closing the request, the certificate is automatically imported to the PAM360 repository.
- Also, the issued certificate is e-mailed to the user who raises the request, the user who closes the request and also to those e-mail ids specified at the time of closing the request.

11. Control Expiry Notification Schedule
You can customize the periodicity of notifications you receive when a certificate is about to expire. To customize the notifications:
- Navigate to the Admin >> SSH/SSL Config >> Notification Settings.
- Select the Notify about SSL certificates are expiring within checkbox and the number of days before the expiry of certificate within which you should start receiving notifications.
- Select the Email or Syslog checkbox and enter appropriate details. To know more about configuring notifications, click here.
- Click Save.
Note: You will receive notifications every day after the selected date before the expiry of a certificate. For instance, if a certificate is about to expire in the last week of a month, and you select the Notify if SSL certificates are expiring within 7 days option, then, you will receive a notification that your certificate is about to expire every day of the week before the expiry of the certificate.
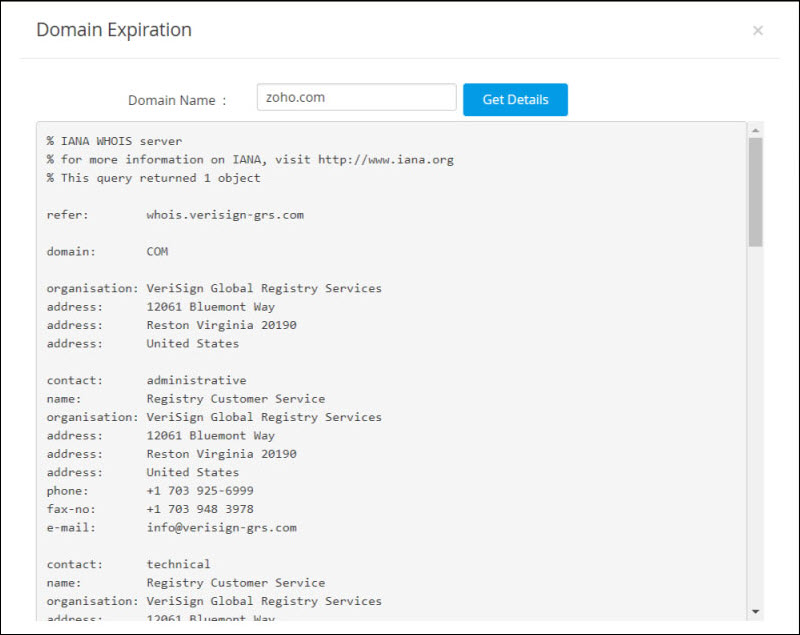
12. Track Domain Expiration through WHOIS Lookup
Apart from tracking certificate expiration, PAM360 also helps administrators keep a tab on their expiring domain names through an automated WHOIS look up. The domain expiration details fetched through the lookup are displayed in Certificates >> Certificates tab against its corresponding SSL certificate. Also, administrators can choose to receive timely email notifications of their expiring domains by configuring it under Admin >> SSH/SSL Config >> Notification.
12.1 How does the WHOIS lookup work?
Fetching domain expiration details requires a two-stage lookup to WHOIS servers from PAM360. The first lookup provides the details of the WHOIS server with which the domain was registered by its domain registrar. The second lookup provides information about the domain such as owner details, expiration date etc., All these operations are automated the from PAM360's interface.
Note : Connection to WHOIS servers requires the use of Port 43. Ensure that port 43 is open in your environment, else the connection would fail and Domain Expiration will be marked Not Available (NA) in the Certificates tab.
13. SSL Certificate Group
PAM360 allows you to organize SSL certificates into various logical groups and execute actions in bulk on the groups.
13.1 Create Certificate Groups
To create a certificate group,
- Click the Certificate Group icon in the top-right corner of the Certificates tab.
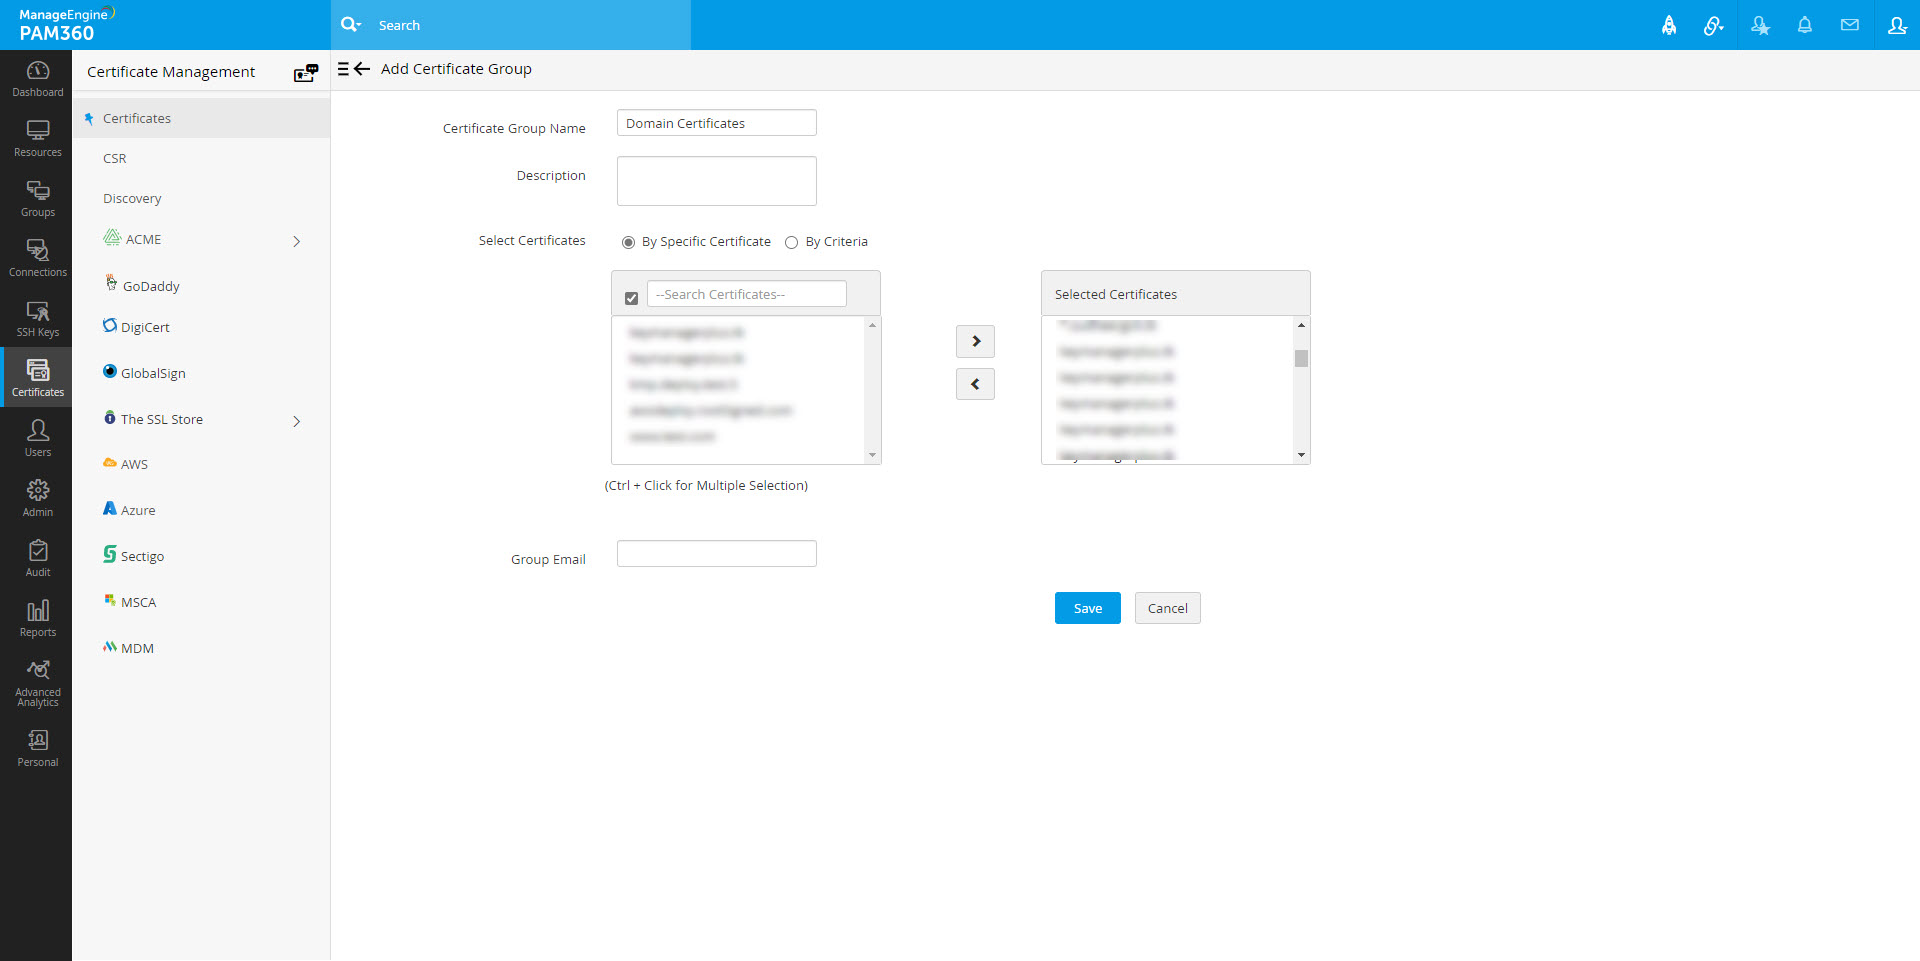
- Click Add Group. You will be directed to the Add Certificate Group page.
- Provide a name for the certificate group and an optional description. Exercise caution while providing the name since it cannot be changed later.
- You can choose certificates to be added to a group in either of the following ways:
- By Specific Certificate - Select the certificates to be added to the group individually and click Save.
- By Criteria - This serves as a dynamic method of grouping certificates. You will specify various criteria based on which the group will be created. Here, you can choose certificates based on various criteria such as issuer, common name, key algorithm, key size, key length etc. The additional fields that are added will also be displayed in the list. You can filter the search in a fine-grained manner based on conditions such as equals or does not equal, contains or does not contain, starts with or ends with. Click the Matching Certificates button at the bottom-right corner to see the corresponding certificates. Click Save. The certificate group is created.
- Mention the Group Email address to send expiry notifications and click Save.
- The certificate group is created. To know more about additional fields, click here.
13.2 Edit Certificate Groups
To make changes to existing certificate groups,
- Click the Certificate Group icon on the top-right corner Certificates tab.
- Click the edit icon present in the right corner of the table view.
- You can change the certificate selection type, edit the certificates present in a group or add, modify or delete the filters applied to a group.
- Once you update the changes and save them, a pop up message will be displayed confirming the updates.
Note: The certificate group name cannot be modified. However, you can add or modify the list of certificates in a group or the description.
13.3 Delete Certificate Groups
To delete a certificate group,
- Click the Certificate Group icon on the top-right corner of the Certificates tab.
- Select the groups that you want to delete and click Delete.
- A pop-up window will appear asking you to confirm the action. Click OK and the selected certificate groups will be deleted.